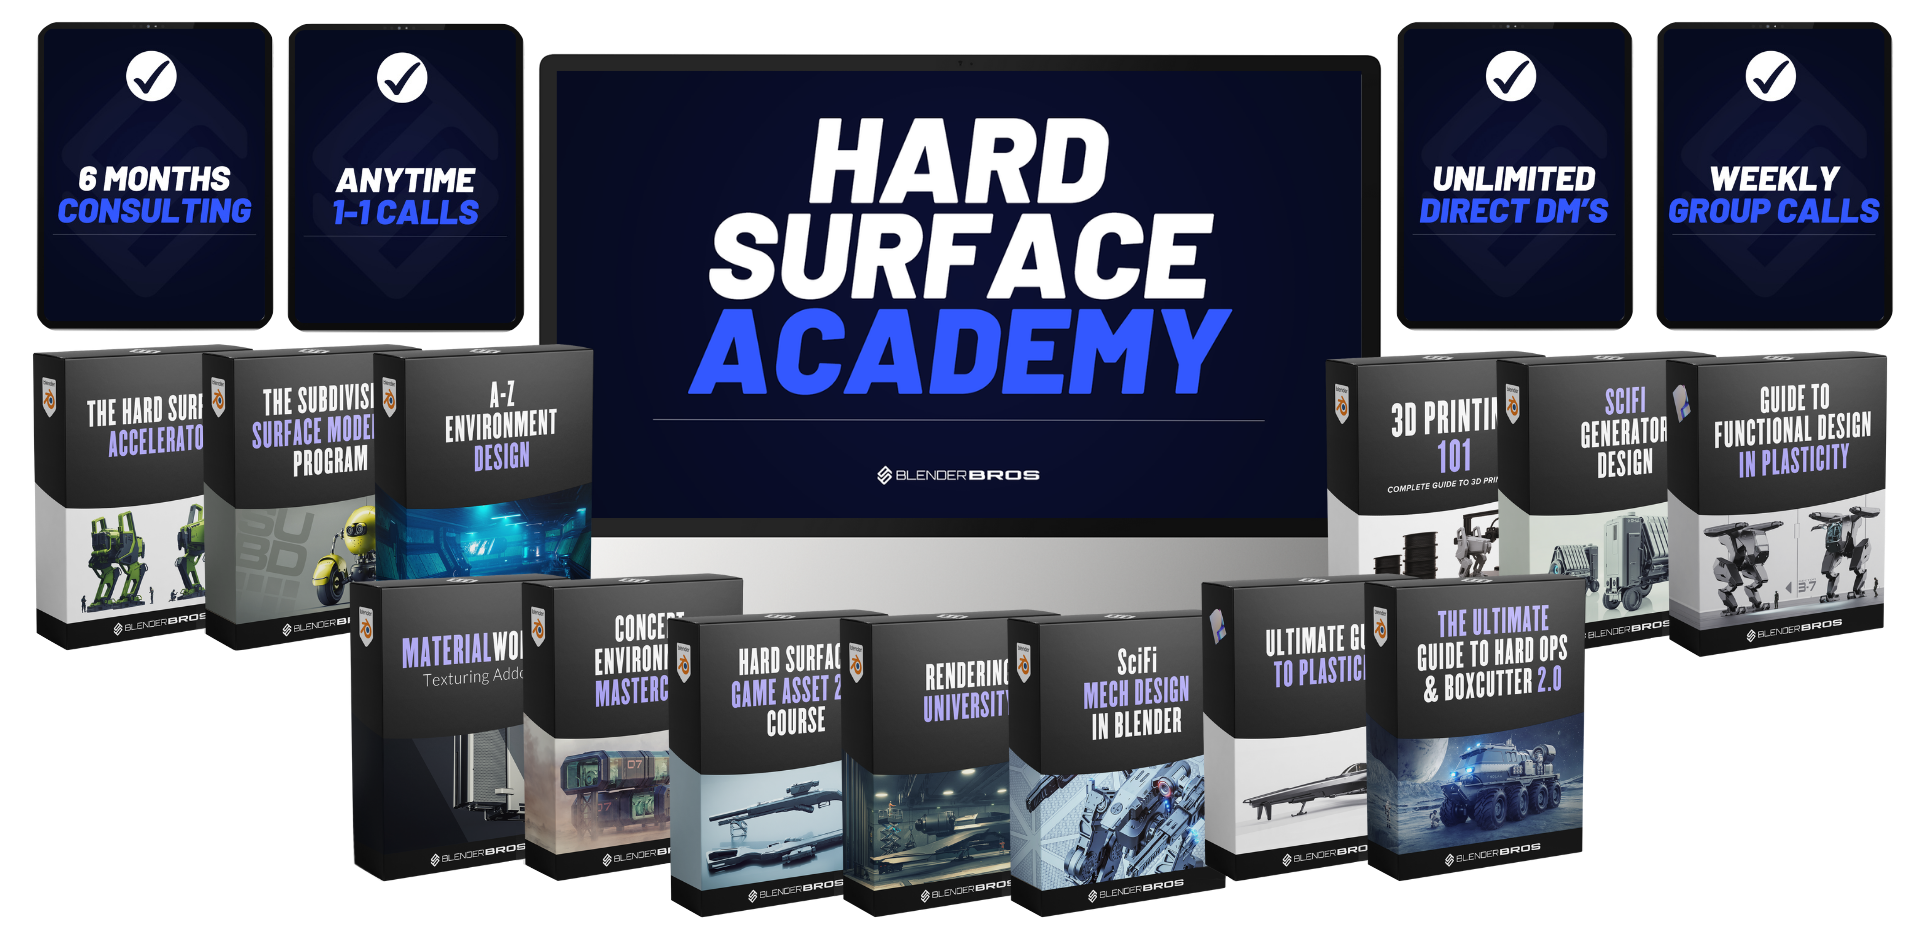
Get All Of Our premium Blender courses + AnyTime 1-1 Calls For Help, Unlimited Direct Messaging, And Weekly Live Q&A Calls with blender bros
we'll help you fix your hard surface modeling issues fast with 1-1 support, weekly coaching calls, and full access to all of our blender + plasticity courses.
customized PRIVATE 1-1 COACHING FOR BLENDER & PLASTICITY + lifetime access to the complete curriculum of courses
Save time via 1-1 coaching with Blender Bros (see video below for info).
Work 1-1 with josh & ryuu to build or fix your 3d portfolio in as little as 2-4 weeks - and turn it into a magnet for followers, clients, or studios
Get personalized 1-1 coaching, weekly critiques, and clear feedback to build a clean, consistent 3D portfolio that impresses studios, wins clients, and grows your following.
Ryuu and I will work with you 1-1 to help you build or refine your 3D portfolio from scratch - focused specifically on fixing your weak points so that you start getting attention on your work as soon as possible.
Book a call below and we'll design a custom solution, tailored specifically to your needs in Blender.
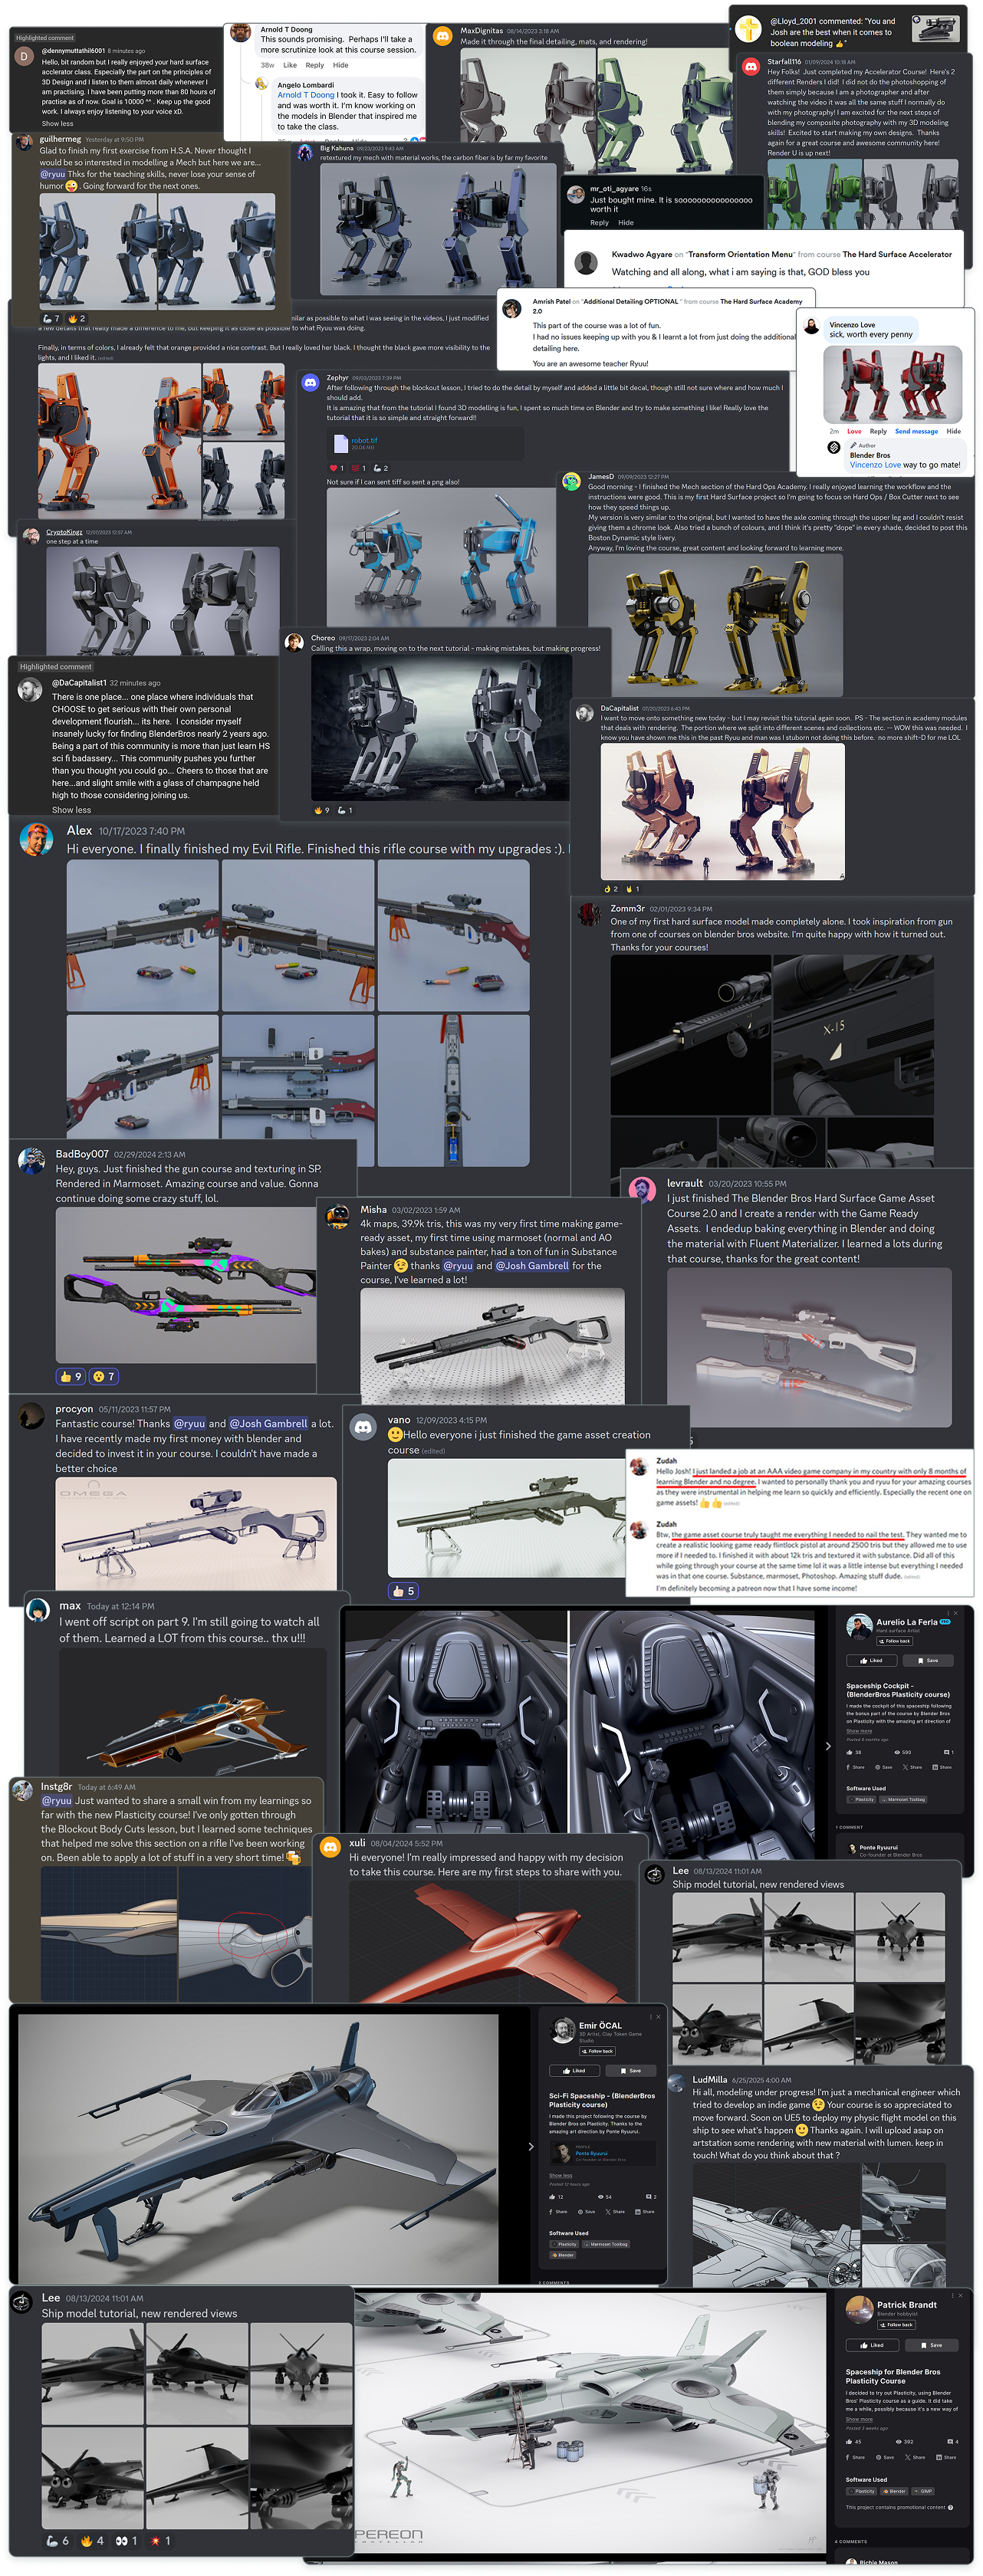
Student Testimonials
STEP 2: SCHEDULE A CALL BELOW
On the call, we'll discuss your goals & challenges with Blender and see if The Hard Surface Academy is the right fit for you.
No times available for you? Email us at [email protected] for a custom slot.
access OUR COMPLETE BEGINNER to ADVANCED BLENDER TRAINING PROGRAM
Do NOT waste your time learning this stuff elsewhere. This is everything you need to reach an advanced level in weeks - not years.
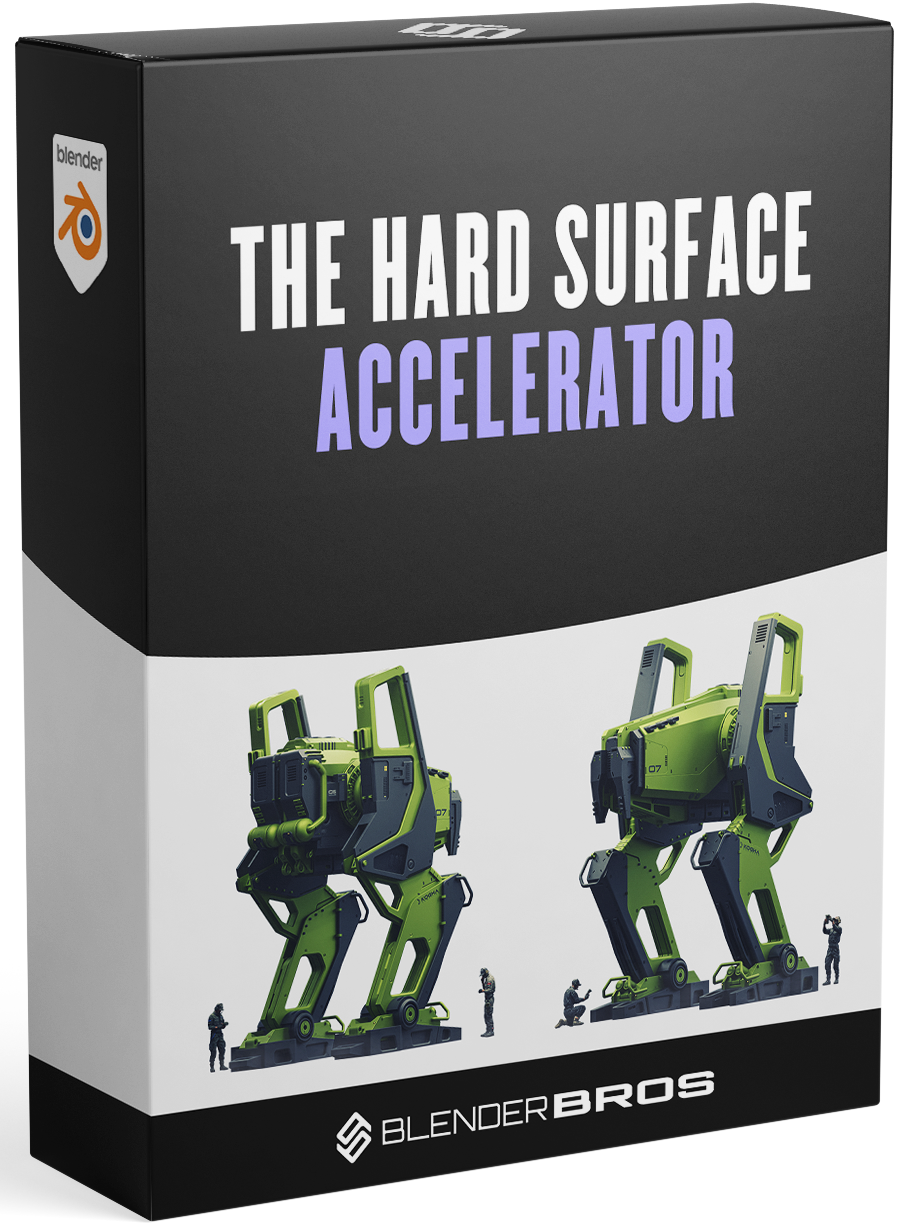

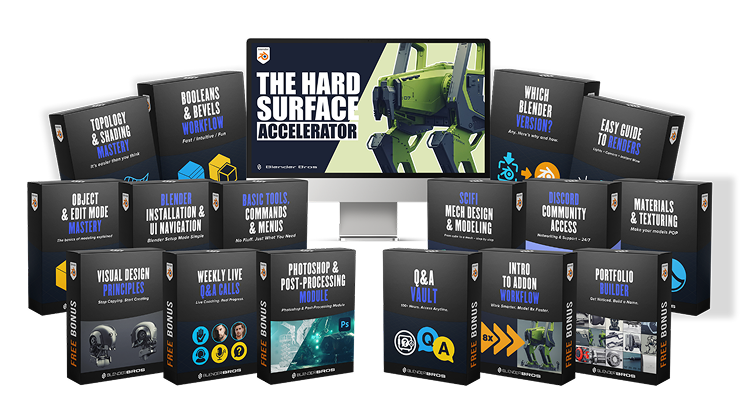
the hard surface accelerator
Replaces scattered tutorials with a fully structured Blender learning path
Takes you from beginner to intermediate step by step
Helps you confidently design and model your own projects from scratch
Let's cut the fluff. We're gonna knock out all the common pitfalls people run into with hard surface modeling. Watch it and sit in awe at how much more sense Blender will make.
Learn Blender's UI, setup, and how to get started with everything
'Skip the line' by learning all the common topology & shading problems people always ask us about.
Learn everything, A-Z, from modeling to materials to creating a marketable portfolio.
Having a place to refer to when you run into annoying problems and can't seem to figure out the solution is essential, and that's why we created The Hard Surface Accelerator. Start here and consume the content!
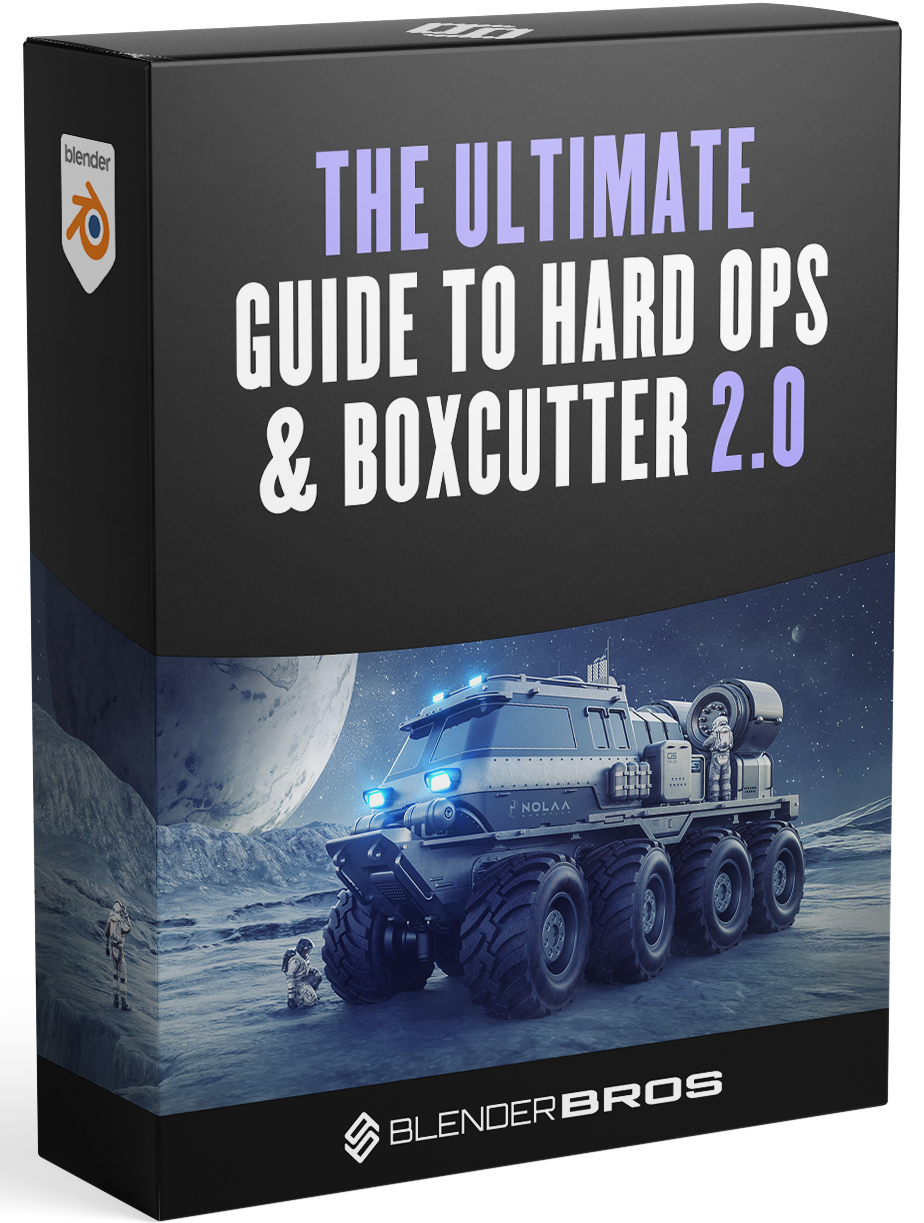
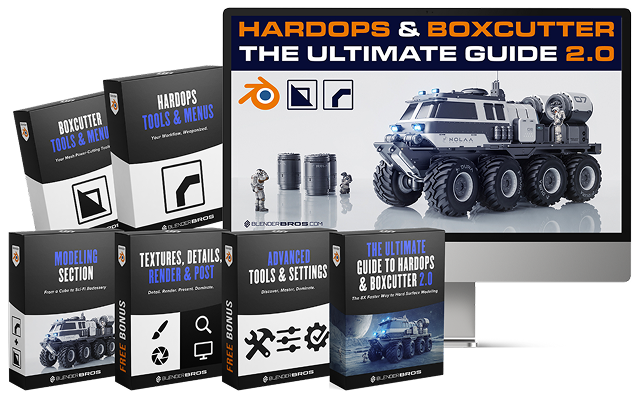
the ultimate guide to hard ops & boxcutter
Gives you a fully structured learning path to master the Hard Ops & Boxcutter add-ons in Blender from installation through advanced workflows
Walks you through foundations, real-world tool usage, and a full sci-fi truck modeling project so you can design, model and render like a pro
Makes your workflow 8x faster by reducing keystrokes and optimizing the modeling process

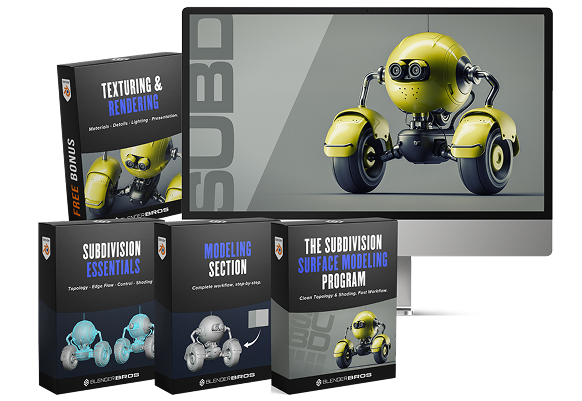
the subdivision surface modeling program
Gives you a fully structured learning path for subdivision-surface modeling in Blender
Teaches you clean quad topology, edge flow, shading management, and how to build subd-based hard surface models from scratch
Shows you how to control pinching, shading errors, and surface artifacts
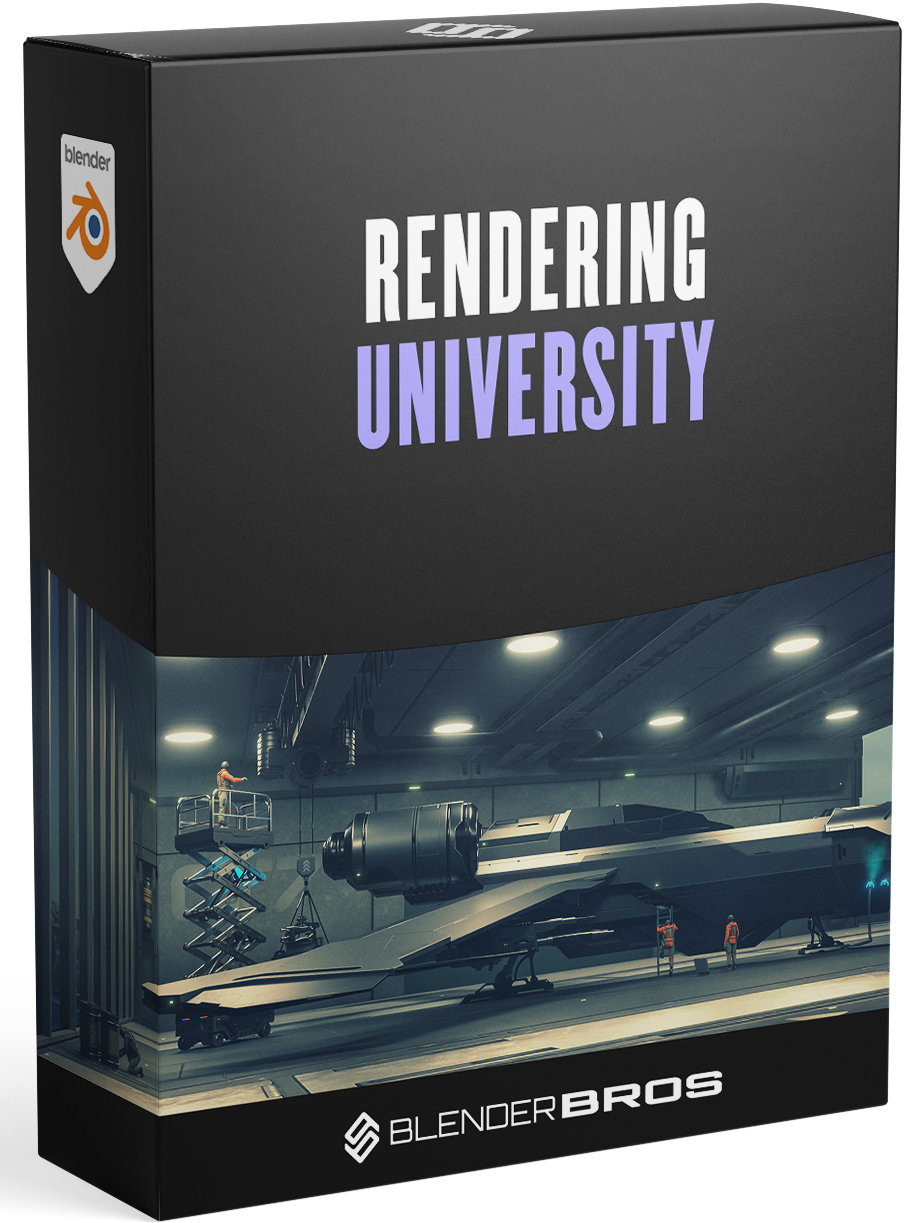
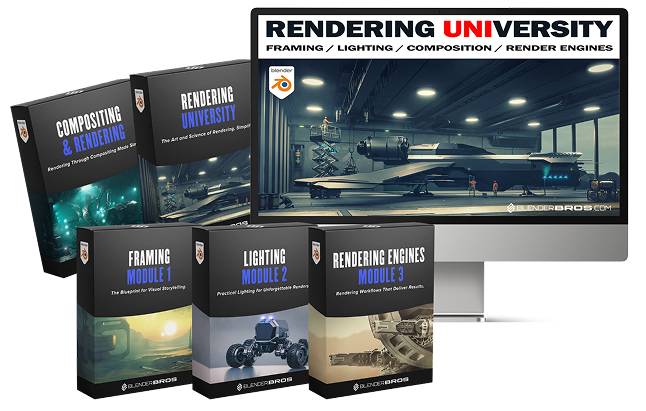
RENDERING UNIVERSITY
Learn how to frame, light, render, and post-process your 3D work.
Gives you a fully structured curriculum across four core areas: framing, lighting, rendering engines, and compositing.
Develops your confidence to use Blender to build a portfolio, set up professional renders, and present work that attracts clients, followers, and job opportunities.
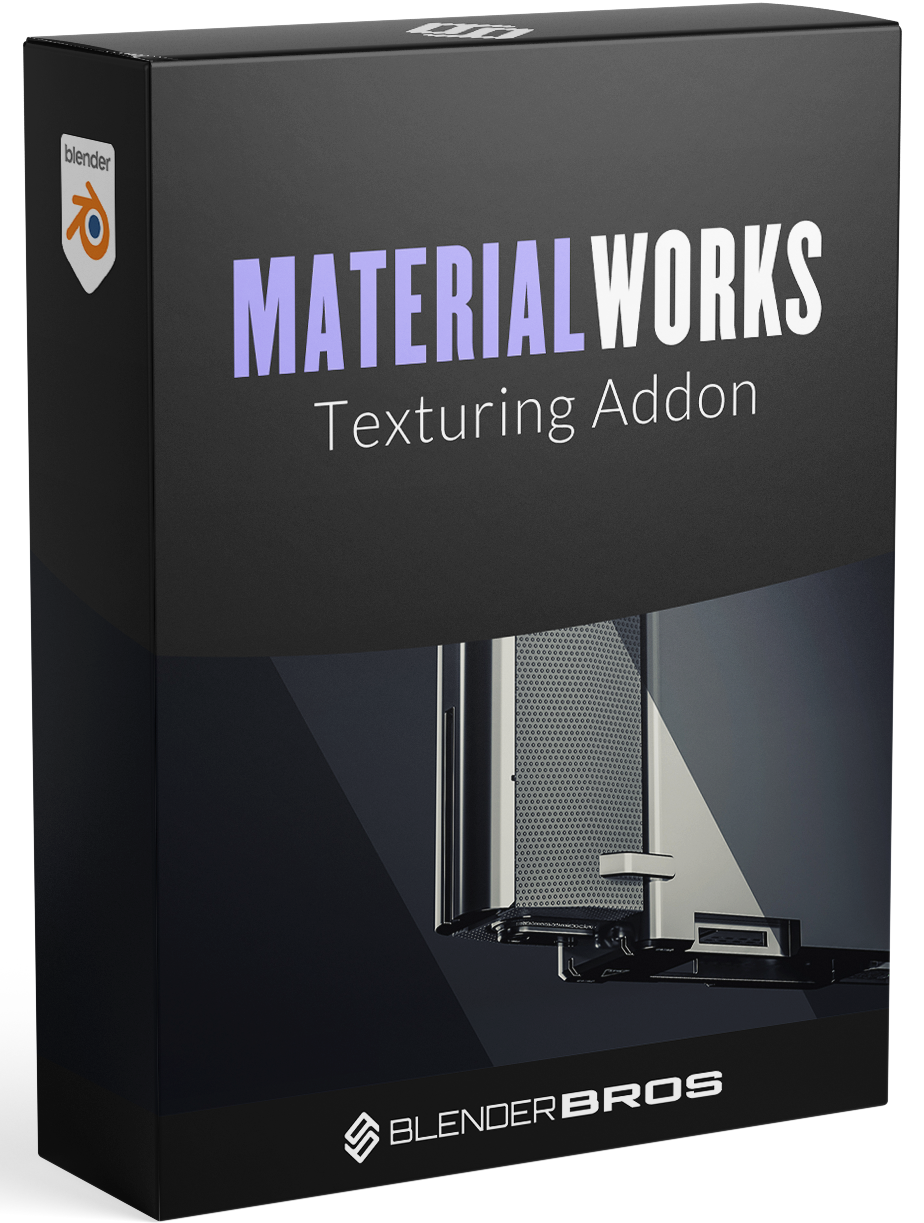
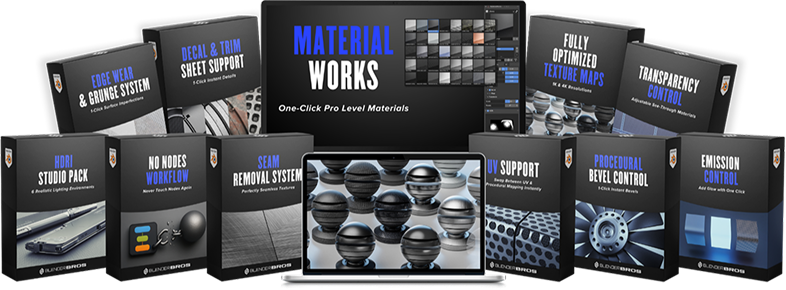
MATERIALWORKS TEXTURING PLUGIN
Lets you apply realistic hard-surface PBR materials, textures & details in one click — no manual node editing required.
Includes edge-wear, grunge generation, and imperfections (dust / scratches / fingerprints) to give your models realistic surface aging.
Supports decals & trim sheets (860+ decals, 20+ trim sheets built in) so you can add detailed hard surface elements without external plugins.
plus additional bonus trainings (optional)
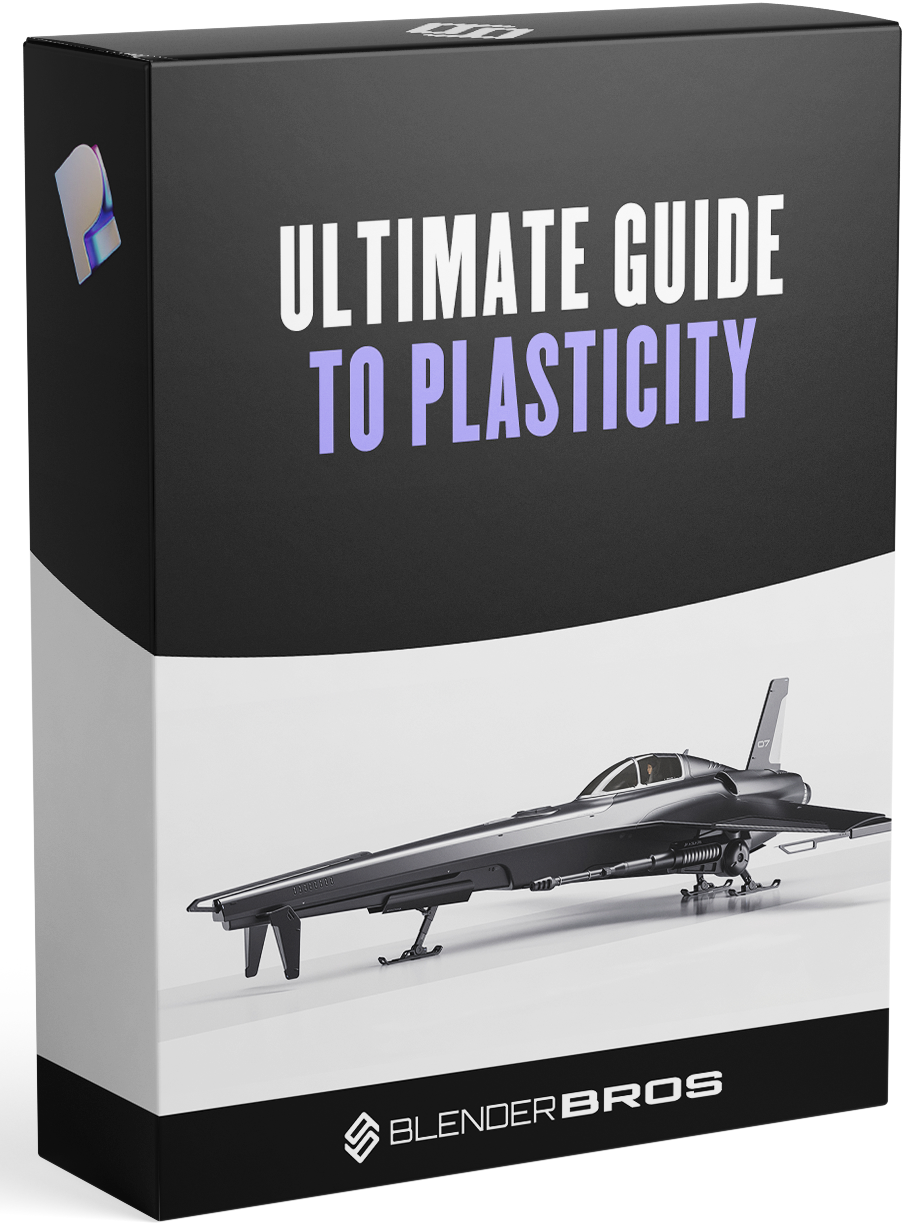
the ultimate guide to plasticity
Teaches you a fully structured CAD surfacing & boolean workflow for Plasticity (a NURBS-based 3D modeling software) in under 12 hours.
Lets you skip messy mesh topology issues since Plasticity uses mathematical surfaces instead of polygon-based topology.
Includes bonus sections on detailing (interior modeling), bridging into Blender for texturing & rendering, and even post-processing workflows.
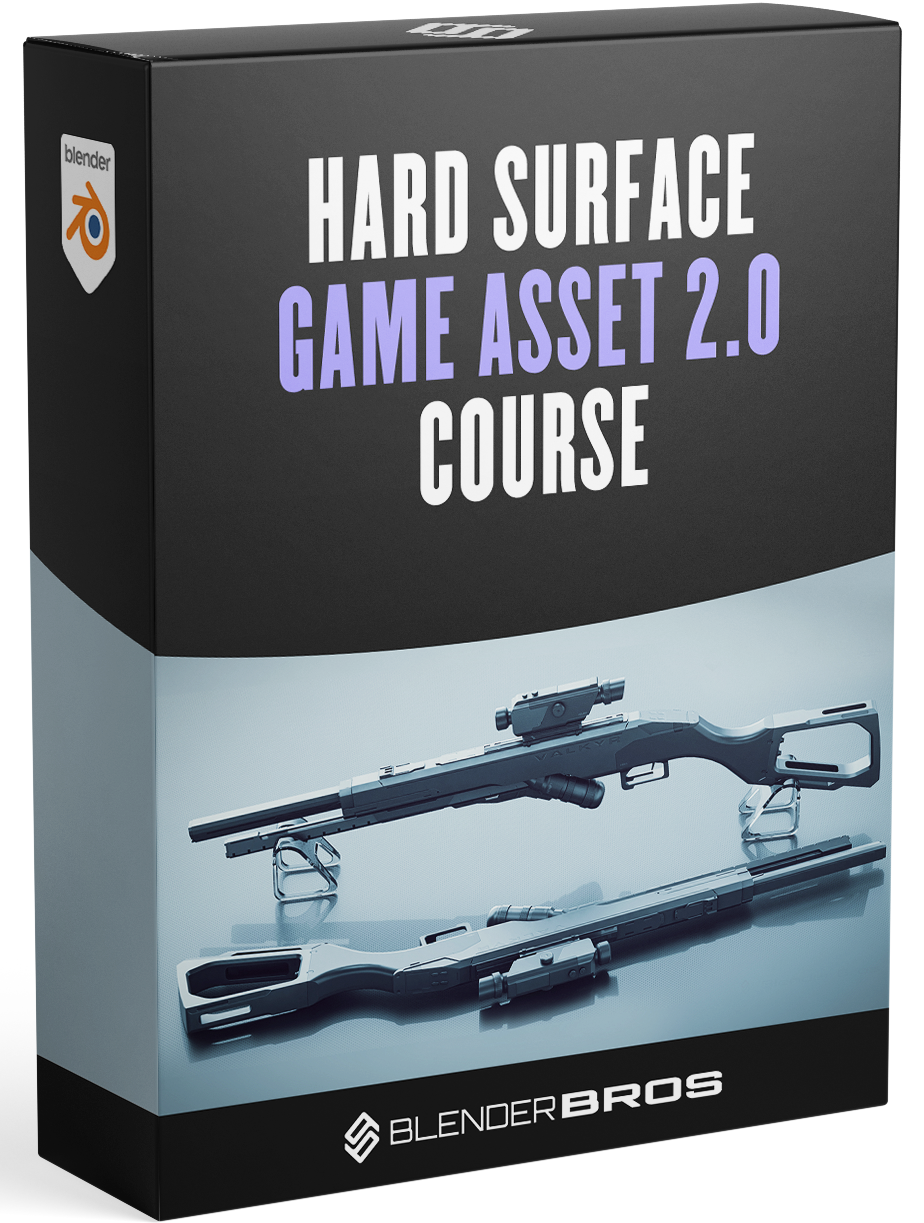
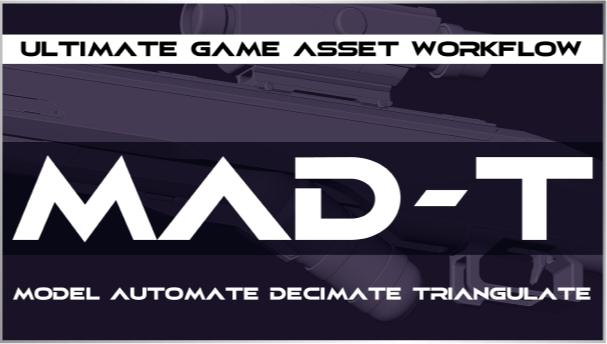
the hard surface game asset 2.0 course
Teaches our 4-step “MAD-T” workflow (Modeling, Automation, Decimation, Triangulation) for creating hard surface game assets in Blender without needing full quad topology.
Covers automation of UV unwrapping, packing, baking, exporting and optimization so your assets are game-engine ready (for engines like Unreal Engine or Unity).
Shows how to model with booleans & ngons instead of relying on traditional quad retopology, saving production time.
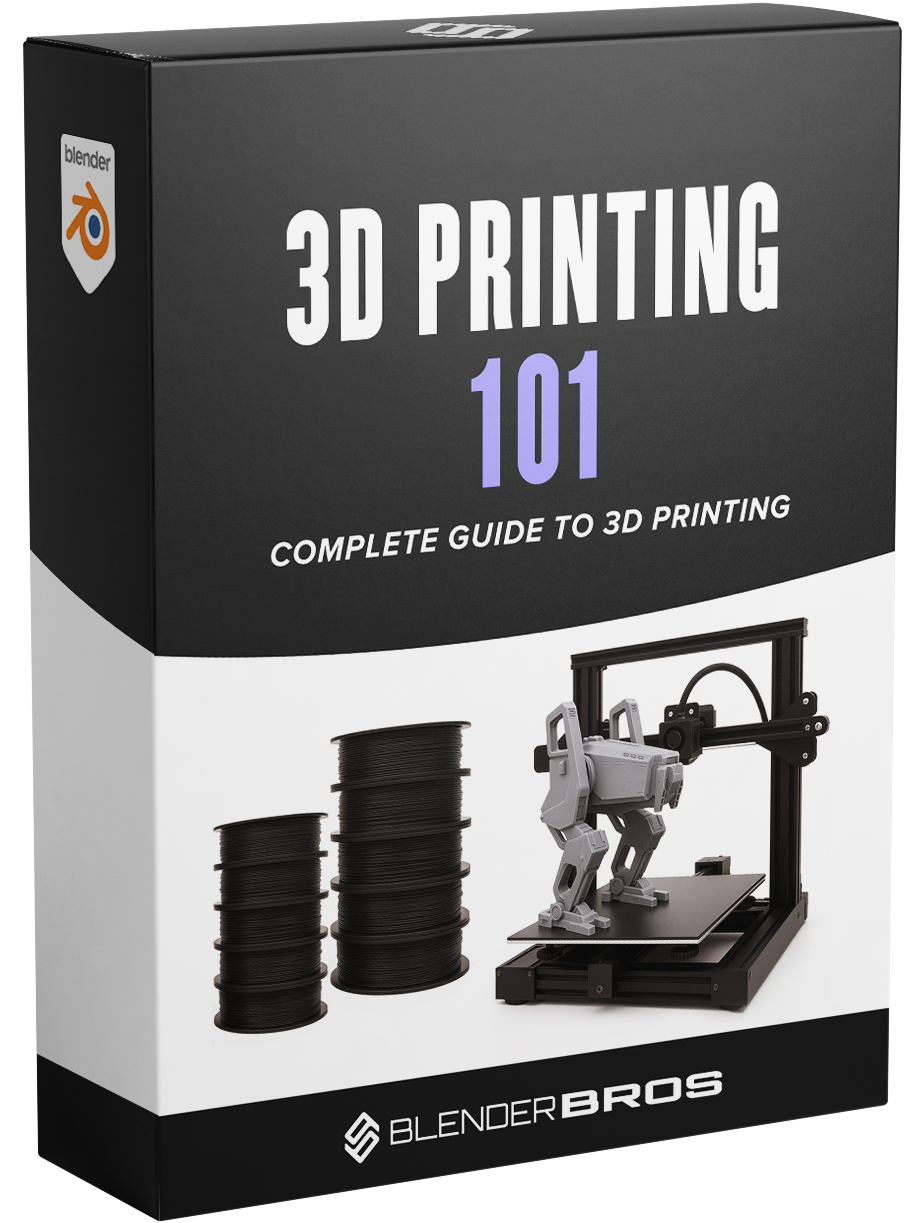
3d printing 101
Shows you how to prep any Blender model for 3D printing — fix scale, geometry, and export issues so it prints reliably.
Helps you eliminate wasted time and failed prints by teaching you to fix holes, normals, thin walls, and slicing errors in under four hours.
Gives you the confidence and workflow to either print your models or sell print-ready STL files, even if you don’t own a printer.
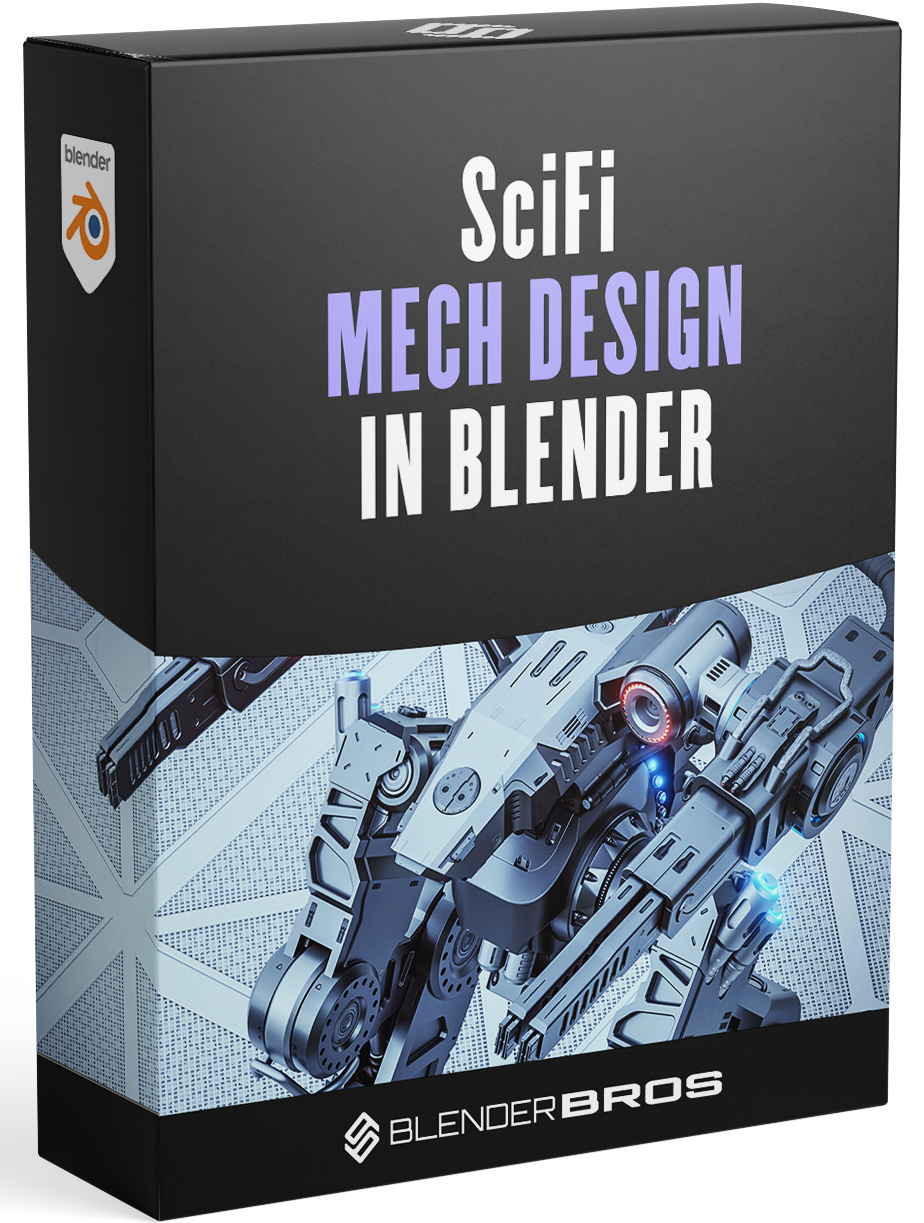
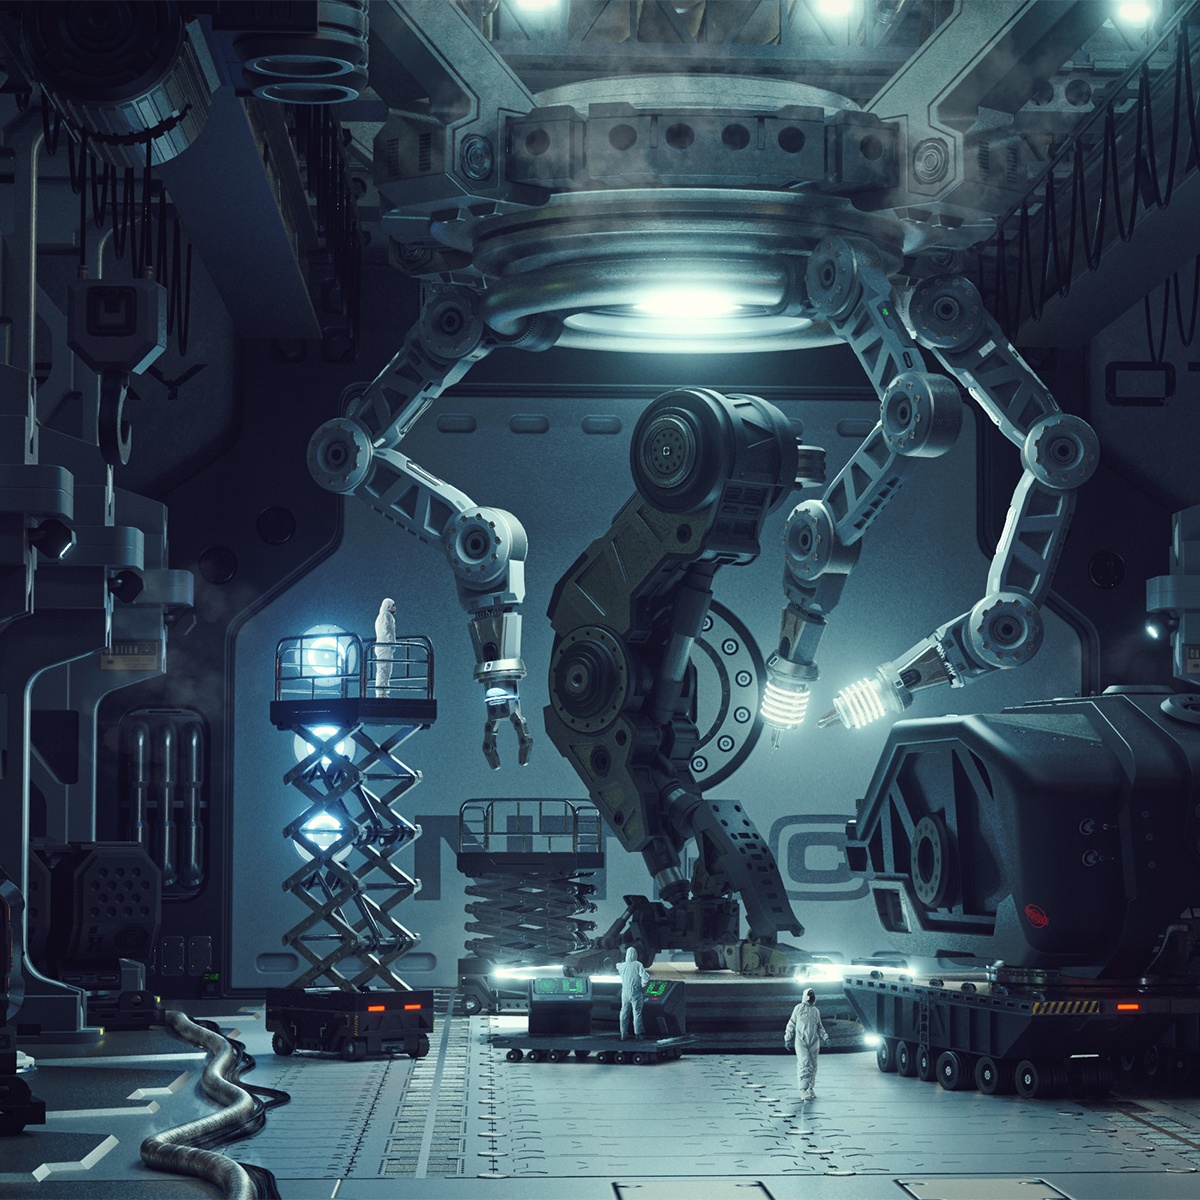
scifi mech design in blender
Advanced Blender modeling + design process, for intermediate & advanced users
50+ hour in-depth & deep modeling training (not seen anywhere else)
This training will put you directly into the top 1% of 3D designers, as you'll learn the full modeling & design process start to finish (real-time videos & commentary, no timelapses)
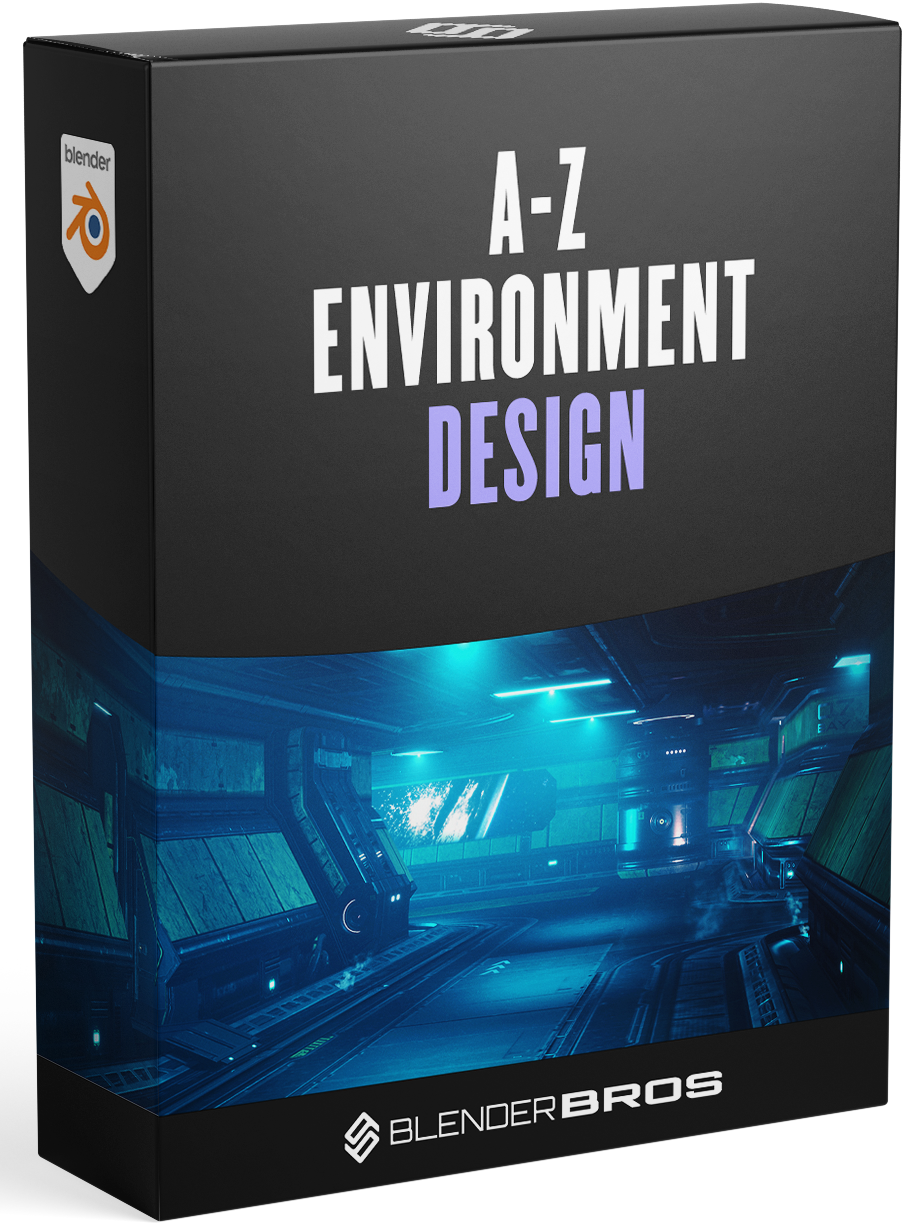
a-z environment design using trim sheets
Learn how to create modular environments directly inside of Blender (build once, reuse forever)
Full training on designing trim sheets from scratch directly in Blender, Marmoset Toolbag & Quixel Mixer
Create a modular SciFi Environment directly in Blender & export into game engines (real-time video trainings).
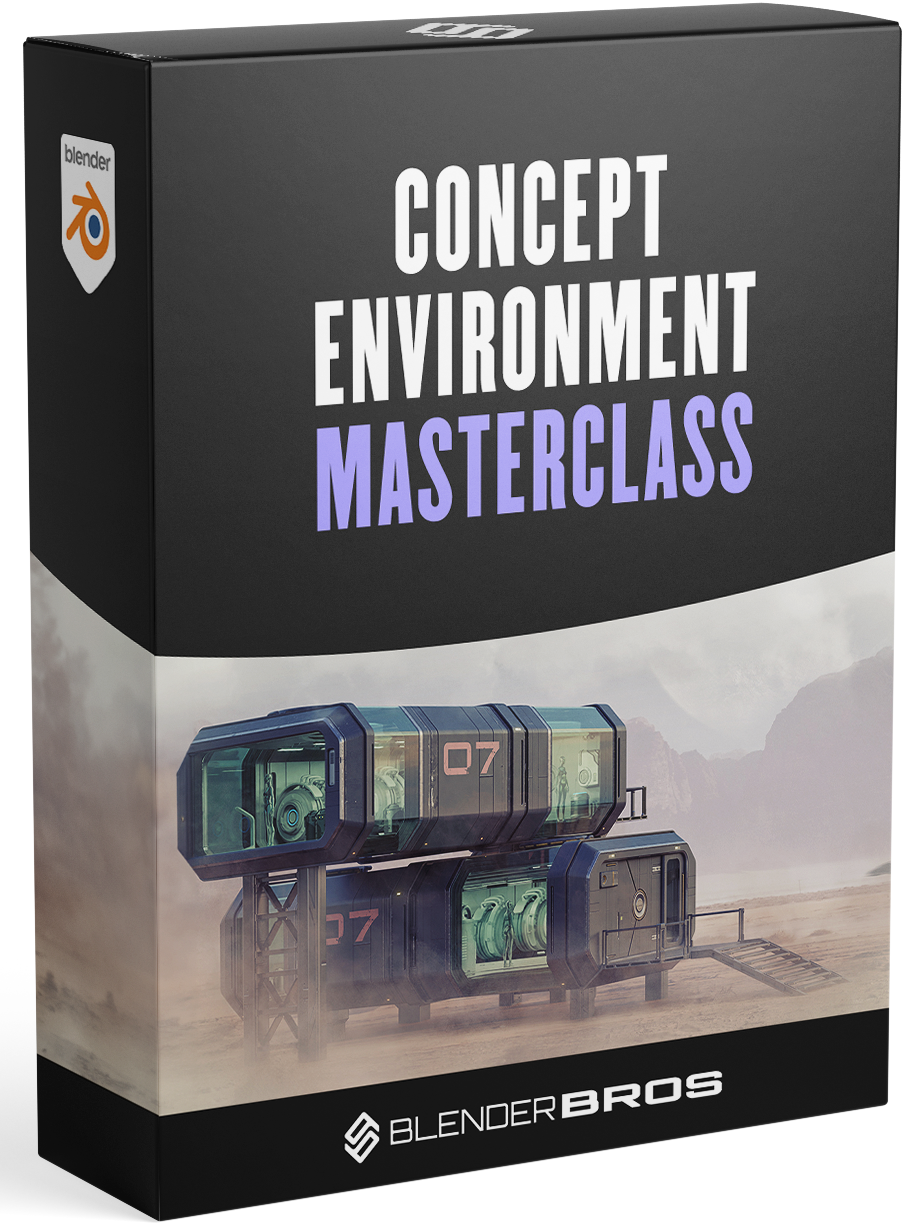
concept environment masterclass
Learn how to create SciFi concept art directly inside of Blender
Full post-processing workflow done in Photoshop
Build, model, & design your scenes directly inside of Blender & build your own concept art from scratch
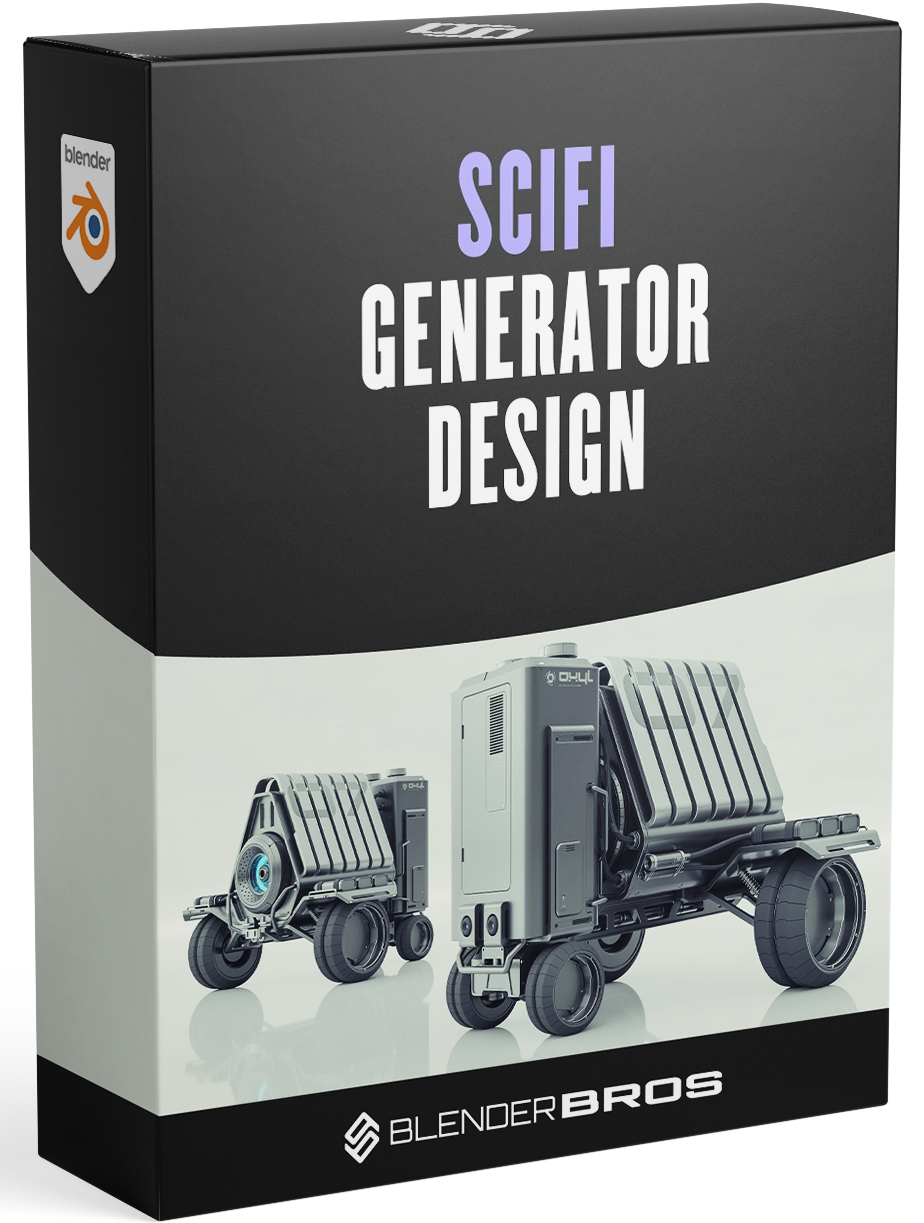
scifi generator design in blender
Full industrial design process inside of Blender, including full modeling & concepting workflow
Create photorealistic industrial scenes directly inside of Blender
Master material & texture creation, giving your models a professional "feel" in seconds
get private 1-1 coaching & help from josh & ryuu for 6 months
All included as part of The Hard Surface Academy.
Access to our full training program
Lifetime Access
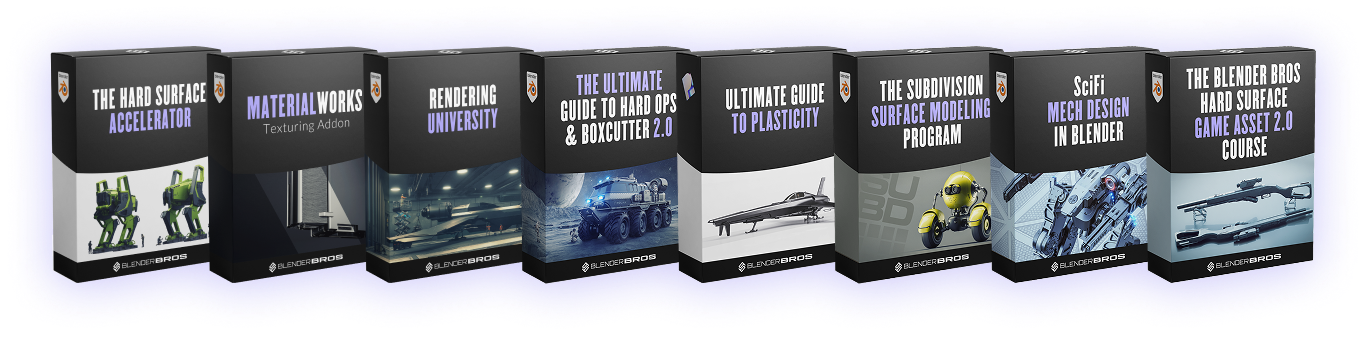
Includes our core trainings:
- The Hard Surface Accelerator
- The ULTIMATE Guide to Hard Ops & Boxcutter
- Rendering University
- The Subdivision Surface Program
- MaterialWorks Texturing Plugin (this is an addon - not a course)
Plus our optional trainings:
- 3D Printing 101
- The Hard Surface Game Asset 2.0 course
- The ULTIMATE Guide to Plasticity
- Concept Environment Masterclass
- A-Z Environment Design Using Trim Sheets
- SciFi Mech Design
- SciFi Generator Design
6 Months 1-1 COACHING

Get 6 months of 1-1 help from Blender Bros.
INCLUDED
wEEKLY q&a calls

Access weekly live coaching calls with Josh & Ryuu for help.
INCLUDED
Unlimited direct messaging

Message us anytime for help or questions.
INCLUDED
AnyTime 1-1 Calls

Stuck on something tricky? You'll get your own private Discord channel, where you can give us a call if you need help.
INCLUDED
Are payment plans available?
Yes. Payment plans are available on the checkout page.
You'll need to choose the 'Klarna' or 'Afterpay' option as we use them for payment plans.
Why not just learn on YouTube?
We get this question all the time.
If YouTube was effective in terms of information and time-saving, nobody would be visiting this page looking for help.
So can you piece everything together with YouTube? Yes.
Is it efficient and cost effective? Absolutely not as it'll take you years instead of a few weeks.
There are also certain things that come with experience that you simply can't get on YouTube - for example solving a technical problem on the spot.
Or stuff like feedback, guidance, etc. That only comes with real human support which is exactly what we provide here.
Can I see student results?
Yes, the videos at the top of the page are from previous/current Academy members.
We also have a full testimonials page here.
How does the coaching work?
If you choose the coaching option, here's what we do:
- You get lifetime access to all of our hard surface modeling courses & products
- You get 6 months of private 1-1 access to us for help
- You get 6 months of weekly Q&A calls
Our normal hourly consulting rate is $250/hour, so this is the cheapest & most cost-effective way to get access to us without paying that fee.
The way it works is we invite you into a private Discord channel that only you have access to.
Inside, you'll have access to Ryuu and I whenever you need help or have a question.
You can send a screenshot, video, or if it's more complex we can hop on a quick call with you.
The weekly Q&As are optional, but effective.
We can dive way deeper into your problems or projects and help you even further, while also giving you weekly guidance for what to focus on.
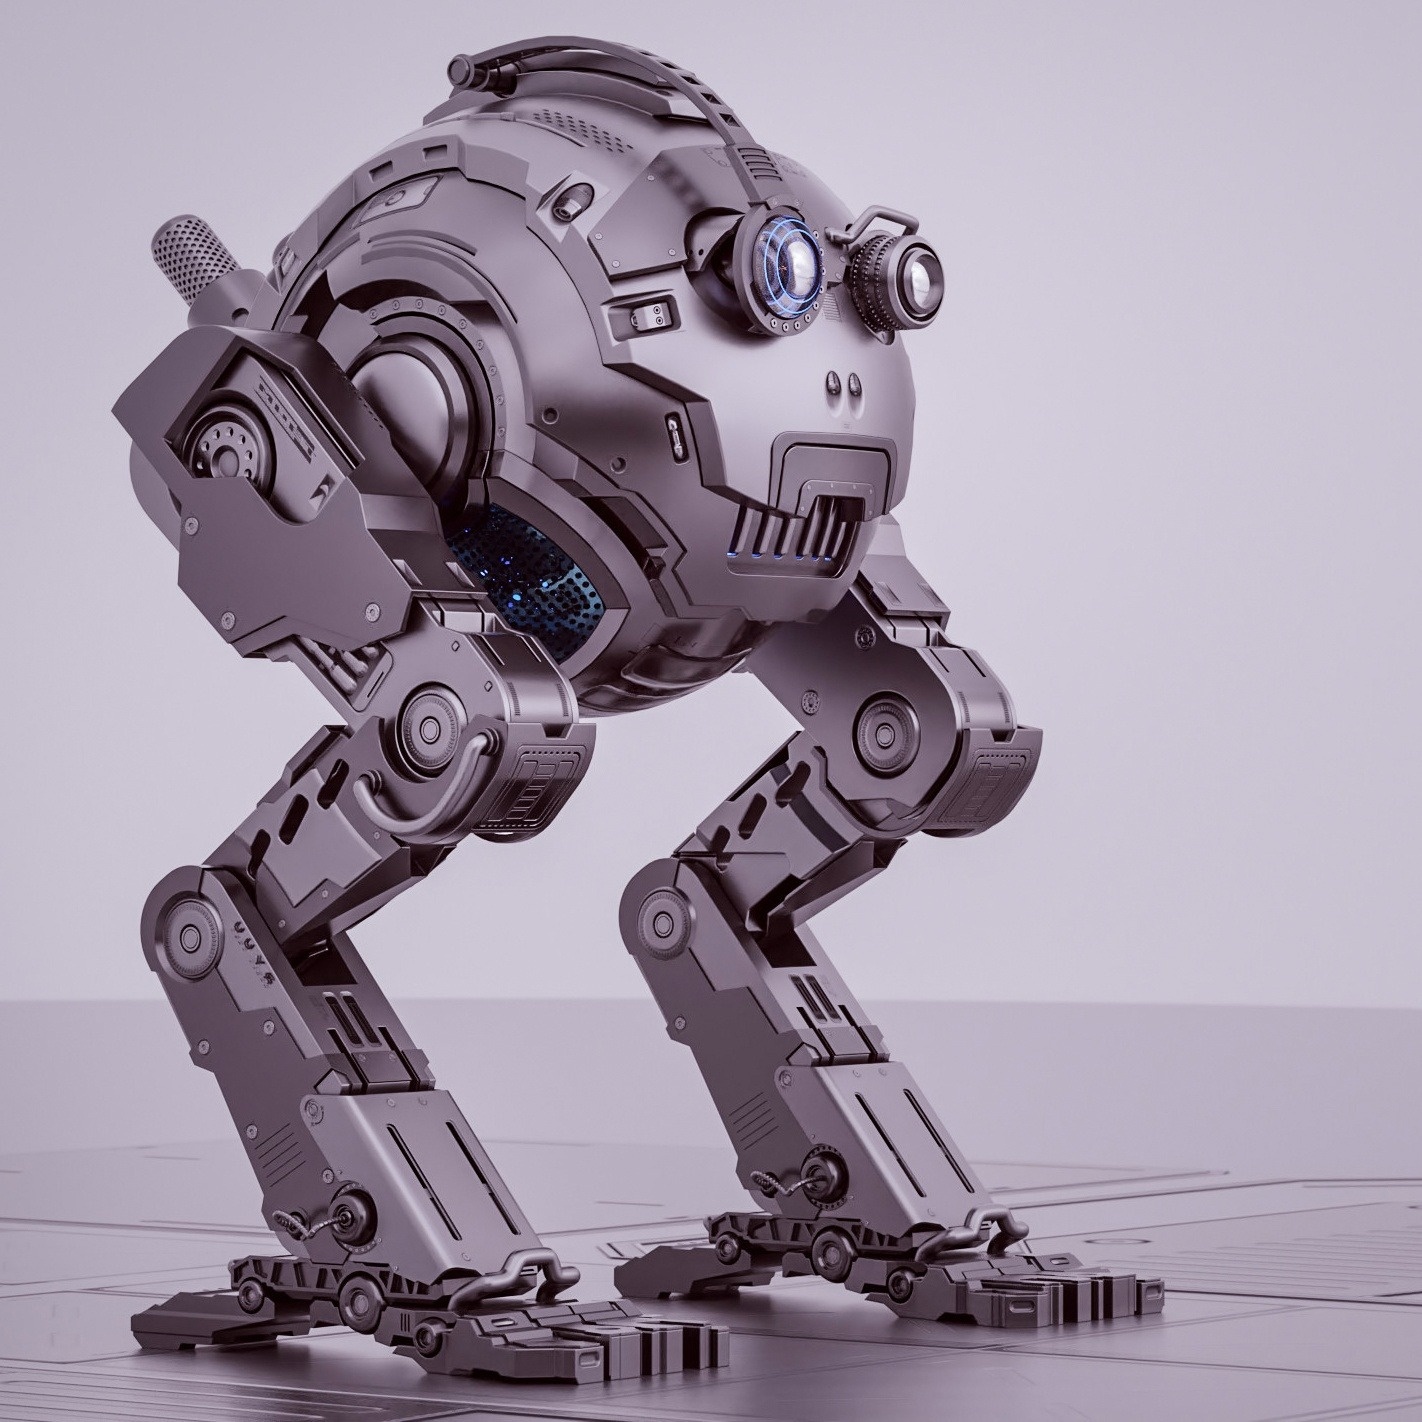
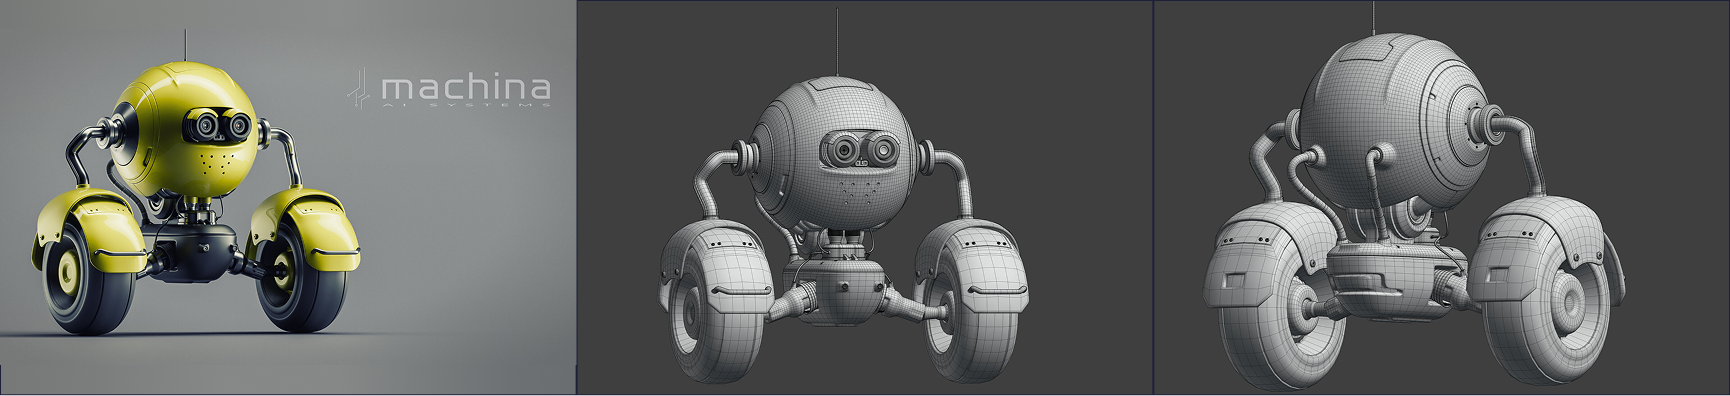
MODULE 1: THE HARD SURFACE ACCELERATOR

Learn the foundations of hard surface 3D modeling in Blender – in just 30-60 minutes per day over a 2-week period. This will give you the entire foundation for 3D hard surface modeling in Blender
Create your first high-level Blender project, a SciFi Mech Robot, with our step-by-step video training lessons using the tools that we teach inside the program.
Learn the essentials of 3D visual design (to make your models look interesting), the essential 3D modeling tools, rendering, and creating your first portfolio piece to share online.
14-Day Curriculum
Day 1: Welcome, Blender Installation & UI Navigation
- Welcome
- How To Succeed (The 80/20 Rule)
- Downloading Blender
- Blender Setup
- Machin3 Tools Installation
- PowerSave Installation
- Introduction to Blender's UI
- Menus
- N Panel, T Panel
- Collections Panel
- Properties Panel
- Viewport Shading Menu
- Pivot Menu
- Transform Menu
- Snapping Menu
- "Top Left" Menu
- Cursor and Origin Point
- Windows
- Extra Menus
Day 2: Basic Commands & Modifiers
- Introduction to Basic Commands
- Selection
- Transformations
- Adding Objects
- Duplication
- Delete & Undo
- Visibility
- Different Views
- Object & Edit Mode
- Movement Fix
- Introduction to Modifiers
- Mirror
- Array
- Bevel
- Boolean
- Solidify
- Weighted Normal
- Applying Modifiers
- Modifier Stack Order
Day 3: Object Mode & Edit Mode
- Introduction to Object Mode
- Scaling
- Shading
- Introduction to Edit Mode
- Modes
- Types of Topology
- Commands
- Selection
- Scaling
- Duplication
- Deletion
- Advanced Selection
- Modifiers with Edit Mode
- Non-Destructive vs. Destructive
- Introduction to Edit Mode
- Modes
- Types of Topology
- Commands
- Selection
- Scaling
- Duplication
- Deletion
- Advanced Selection
- Modifiers with Edit Mode
- Non-Destructive vs. Destructive
Day 4: Booleans & Bevels
– Introduction to Booleans
– Boolean Modifier Overview
– The Bool Tool
– Boolean Organization
– Boolean States
– Boolean Topology
– Modifying Booleans
– Mirroring Booleans
– Deleting Booleans
– Troubleshooting Booleans
– Introduction to Bevels
– Bevel Commands
– Types of Bevels
– Bevel Segments
– Bevel Profile
– Common Bevel Problems
– Bevel Modifier
– Limit Method
– Bevel Shader Overview
Day 5: Mirrors, Solidify & Arrays
– Mirror Modifier Overview
– Ways to Mirror
– Types of Mirrors
– Important Mirror Info
– Solidify Modifier Overview
– Array Modifier Overview
Day 6: Topology & Shading
– Introduction to Topology & Shading
– Understanding Topology
– Understanding Shading
– Identifying Topology Problems
– Identifying Shading Problems
– Non-Manifold Geometry
– Booleans on Curved Surfaces
Day 7: Materials & Principles of Design
– Introduction to Materials
– Principled BSDF Materials
– The 3 Main Material Settings
– Extra Material Settings
– Linking Materials
– What is 3D Design?
– Core Principles of Visual Design
– Balance
– Emphasis
– Variety
– Movement
– Proportion
– Unity
– Tips for Designing in 3D
– Functionality in Design
Day 8: Rendering, Photoshop & Post-Processing
– Camera Setup
– Camera Settings
– Render Settings
– Output Settings
– Setting up a Scene
– Rendering a Scene
– The Eevee Rendering Engine
– Bloom
– Volumetrics
– Introduction to Photoshop
– Photoshop Installation
– Basic Tools & Functions
– Basics of Editing
– Advanced Tools
– Tips & Tricks
– Dodging & Burning
– Smart Objects
– Exporting Images
– Paid Plugins
Days 9-14: The Big Project – Let’s Design A Mech!
– Introduction
– UI Setup
– Blockout Phases (6 videos)
– Mid Details
– Additional Detailing
– Adding Materials
– Rendering
– Post-Processing
– Project Files & Conclusion
BONUS: How to grow as an artist / building your portfolio
– How to become a successful 3D artist
– How to develop your own style
– How to work from references
– How to create an Artstation portfolio
BONUS: Addon workflow
- Addon workflow (quick demo)
project renders

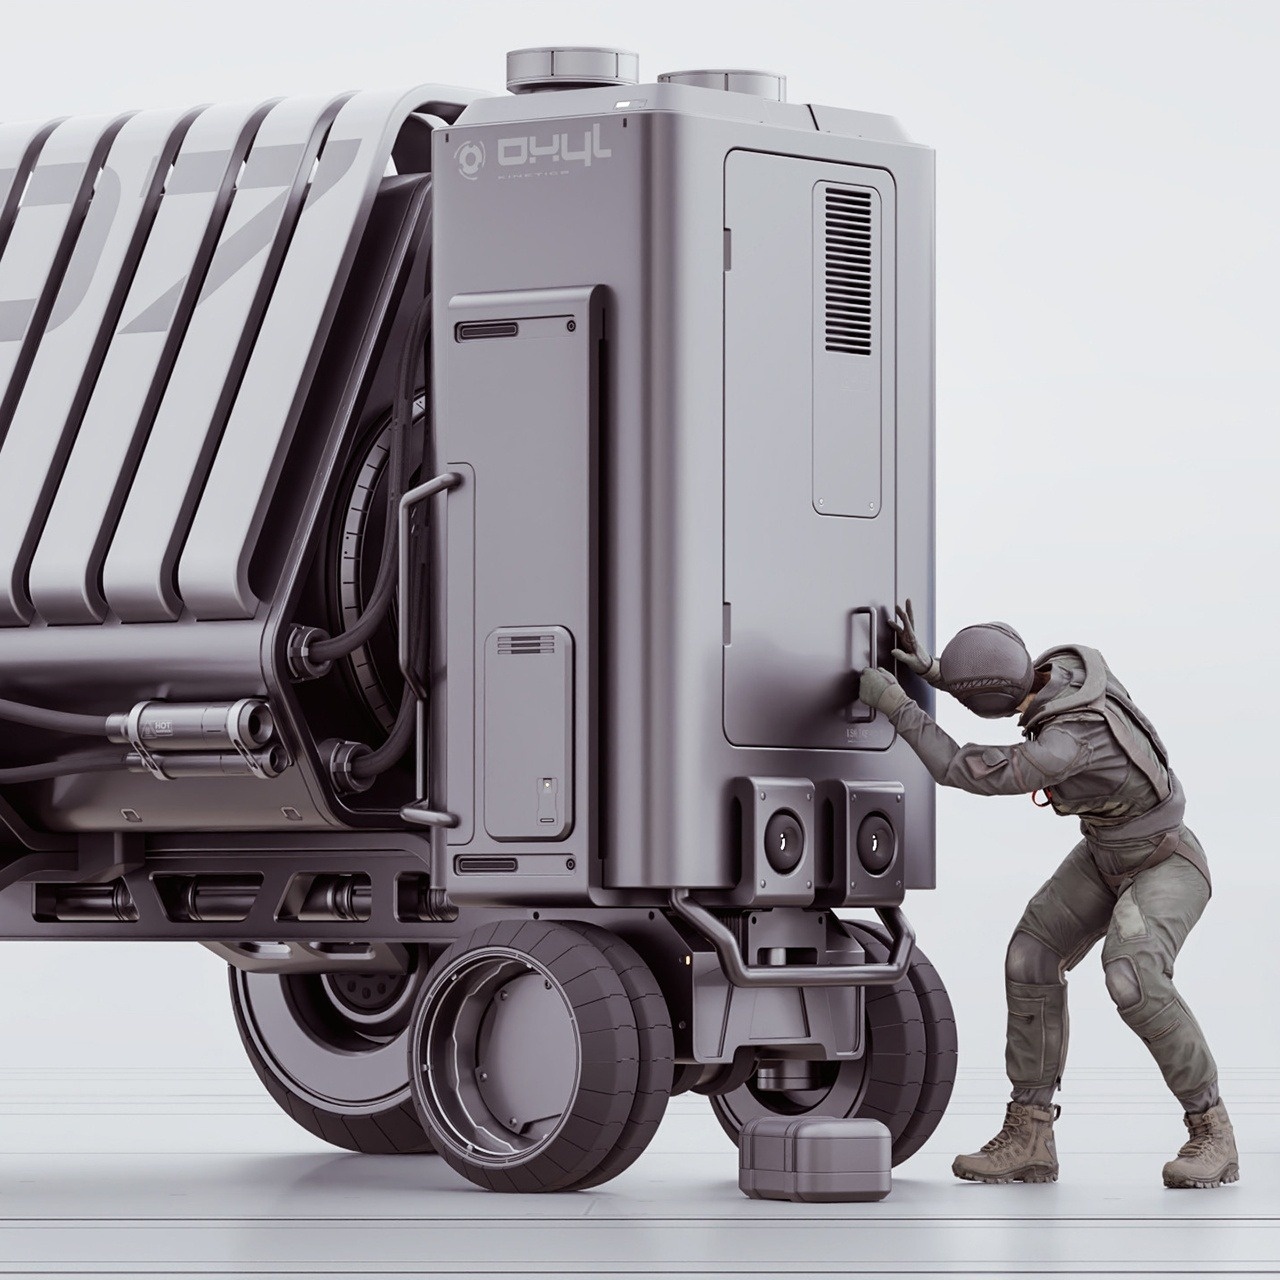
MODULE 2: THE ULTIMATE GUIDE TO HARD OPS & BOXCUTTER
Make your Blender workflow 8x faster by learning the Hard Ops & Boxcutter modeling addons.
Learn all the essential modeling features inside of Hard Ops & Boxcutter in a few short hours. You’ll be equipped with the info you need for life.
Understand how to efficiently run Booleans via boxcutter, eliminating the need for slow, vanilla modeling tools in Blender.
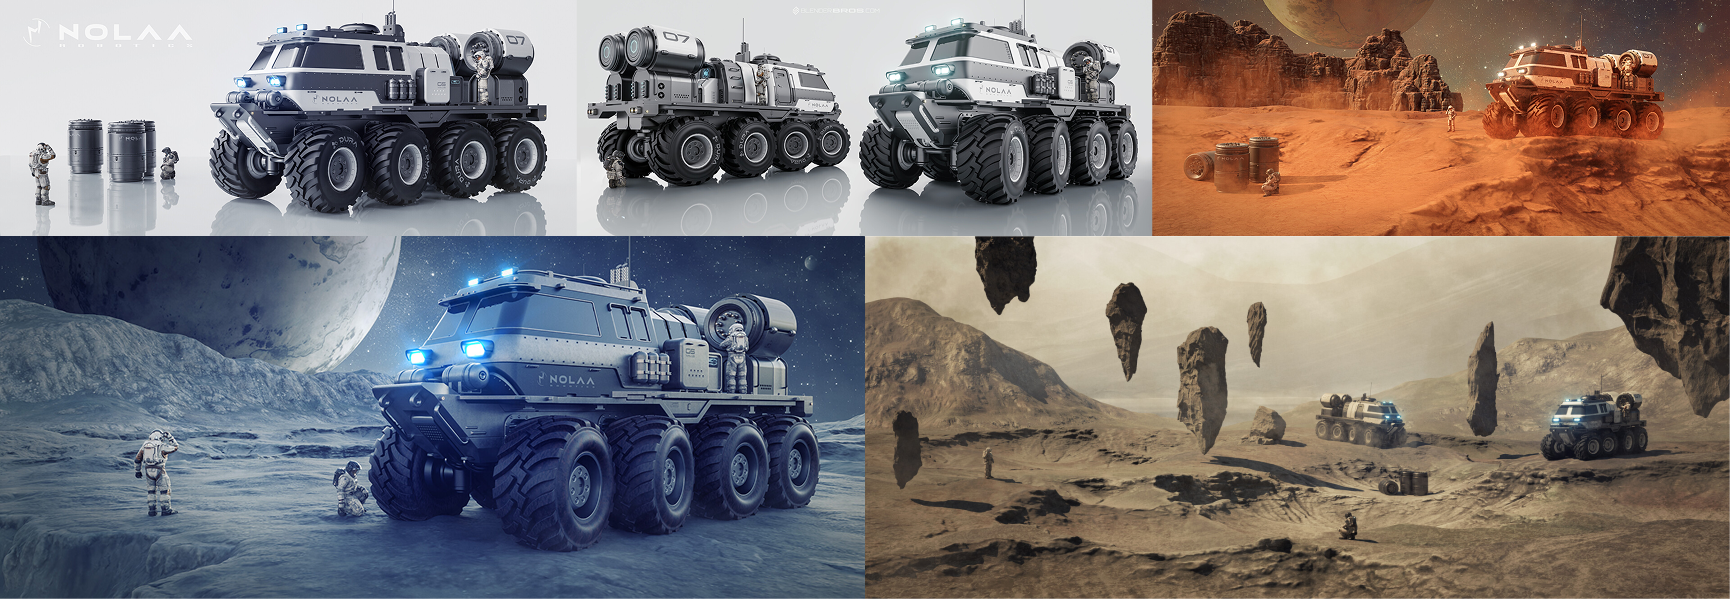
Create your first Blender project, a sick SciFi vehicle, using Hard Ops & Boxcutter. By the end, you’ll have your second project completed & a full understanding of how to model efficiently using these tools.
Cleanup your mesh, detail & texture the truck, set up your scene with basic lights & effective rendering techniques, and create your second portfolio piece.
BONUS TRAINING: Advanced modeling techniques & hidden features in Hard Ops & Boxcutter. Unlock the full potential of these modeling addons to develop your own personalized workflow.
This is the only up-to-date training material for these tools available on the internet – and they’re the only tools we recommend & use for the fastest (and most fun) modeling workflow in Blender – making your modeling speed about 8x faster.
Training Curriculum
Section 1: Introduction & Setup
- Installation & Management — How to install, uninstall, and properly manage the add-ons in Blender
- Troubleshooting & Support — Common issues and how to fix them
- Hard Ops vs. Boxcutter — Key differences, strengths, and how they complement each other
- Optimal Setup — Recommended configurations for maximum workflow efficiency
Section 2: Essentials
- General Workflow Introduction — How to integrate Hard Ops & Boxcutter into real Blender projects
- Menus & Tools in Context — How menus adapt based on what you’re working with:
- Object selection
- Edit mode interactions
- Multi-object selections
- Cutter-specific selections
- Practical Application Focus — Learn tools through real-world use cases to build intuitive, professional workflows
Section 3: Sci-Fi Truck Modeling Project
- Design Fundamentals — Learn the importance of blockouts and refining your concept before detailing
- Hard Ops & Boxcutter for Modelling — Use these add-ons to speed up and enhance your modelling workflow
- Full Project Workflow — Step-by-step guidance on creating a complete sci-fi truck model from start to finish
Bonus #1: Rendering & Post-processing
- Mesh Cleanup & Preparation — Optimize your model for decals, trim sheets, and MaterialWorks texturing
- Detailing & Texturing — Apply high-quality decals, trims, and materials for professional results
- Scene Setup & Rendering — Master composition, lighting, and rendering for a polished final image
- Photoshop Post-Processing — Enhance your renders with powerful post-processing techniques
Bonus #2: Advanced Techniques & Hidden Features
- Unexplored Features — Discover advanced, undocumented tools and functions in Hard Ops & Boxcutter
- Customization & Optimized Workflows — Tailor and streamline the add-ons to match your personal workflow
- Unlock Full Potential — Learn advanced methods to maximize efficiency and creativity with these tools
project renders
MODULE 3: RENDERING UNIVERSITY
Learn lighting, framing, rendering, & post-processing in Blender. We’ve drastically simplified the rendering workflow, meaning it only takes a few minutes to create insane-looking portfolio pieces & renders. This is the exact workflow we use in our own portfolio (which has generated us multiple 6-figures in client work as well – from clients that came to us).
Make your models look as good as they are built. A good model without good presentation is like a professional photoshoot with bad clothing & a bad background.
Full breakdown of Blender’s rendering engines (Cycles & Eevee) + our personal plug-and-play settings so you can just focus on the renders.
Learn our rendering workflow to help get you followers, clients, job offers, or simply clean images to show off and be proud of.
Learn the 4 key points needed to attract attention to your work, and our tried-and-tested techniques to bring power & awe to your renders.
Understand framing, lighting, rendering, and how to assemble your own scene from scratch.
Build complete Blender scenes from scratch – assemble, light, frame & finalize your visuals.
Examples from professional photography – and how to apply it to your own 3D work (you don’t need to be a professional photographer, either)
Training Curriculum
MODULE 1: Framing
Learning how to frame your renders is an essential skill that every 3D artist should have. Without proper framing, your images will look weird and unprofessional. We'll cover:
– The 'Golden Ratio' in 3D
– Leading Lines & Visual Weight
– The Power of Odd Numbers
– Cropping & Negative Space
– Why Breathing Space Is So Important
– Focus, Reflections, & Background Elements
– Frame Filling
– Symmetry & Elements of Importance
– Camera Focal Length & Depth of Field (DOF)
You’ll finish this section with a profound understanding of how to use framing to communicate power & competence in your images.
MODULE 2: Lighting
Lighting is the most important element in your renders. With proper lighting, you can make anything look amazing. This is where most 3D artists struggle the most. We'll cover:
– The types of lights you need for a good render
– Qualities of lighting that make your images more powerful
– How to properly set up lights (and fix common distracting elements)
– A simple way to create depth using light & color
– Why exposure can be a problem if not used correctly
– Why you’re probably using lights in Blender incorrectly (and how to fix it)
Most 3D artists put no effort into their lighting, or simply don't know what they're doing. If you can use lighting to your advantage the right way, your work will stand out amongst your competition and bring attention to your work - guaranteed.
MODULE 3: Rendering Engines
There are plenty of different rendering engines that exist in today's 3D world - but there are two that we use the most in Blender: Cycles & Eevee. However, these concepts apply to just about any rendering engine. We'll cover:
– How to get the most out of your rendering engine
– How we render with a low sample count (even with a slow computer!)
– Our personal rendering settings that we've been using for years (average render time: 1–2 minutes)
– The best way to utilize nodes in Blender for professional rendering results
– How to set up the compositor & shader editor for maximum results
– Simple environment example — render a desert scene from scratch
– (Bonus Video) Rules of Composite Images
– (Bonus Video) Story Telling
Rendering engines are super important to get set up correctly. After you've set it up once, you generally don't need to touch it. But it's important that you get it right to maximize your potential results.
MODULE 4: Compositing
Our final chapter is all about putting everything together with a practical example. We're going to design a scene completely from scratch, and use all the topics covered in the course up to this point. We'll cover:
– How to assemble a complex scene from scratch
– Compositing, lighting & rendering techniques — practical application
– Post-processing in Photoshop to achieve refined imagery
– How to use Blender's node system & compositor to maximize the effect of your renders
– HDRI setup for a realistic feeling in your scenes
– How to put everything from the first 3 chapters together
– Detailed explanation of the thought process behind composition & framing
It's one thing to focus on concepts and theory, but it's another thing to see it all in action. In this section, we're going to create an entire scene from scratch using all the concepts presented in the course.
learn how to render like this:
MODULE 4: THE SUBDIVISION SURFACE MODELING PROGRAM
Understand quad-based topology and clean edge flow (even if subd seems ‘tricky’ or ‘technical’ – psst… it’s really not)
Learn proper topology management so that your models work in a variety of pipelines. Great for VFX, animation, and other workflows where the model needs to be deformed and adaptable
Master loop ‘redirection’ for proper edge flow & subd control. This allows you to create beautiful & natural shading transitions on your model.
Start low-poly, then refine with subd to add detail step-by-step. We show you how to do this in-depth inside of the video training lessons.
Complete modeling workflow & training, where we’ll piece everything together by creating a hard surface bot completely from scratch with quad-based topology. All shown in step-by-step video lessons
Video Curriculum
Proper Topology Management
Learn how to use “clean” quad-based topology to create models that work in a variety of pipelines. Great for VFX, animation, and other workflows where the model needs to be deformed and versatile.
Understanding Edge Flow
It’s one thing to model in quads, but another game to manage topology and edge flow correctly. We show you how to do this without the usual technical stuff surrounding topology.
Designing With Quads
We show you how to design using quad topology from scratch without it being too technical or intimidating, so you will learn how to “think” in quads while working on your own projects.
Creating any Hard Surface Shapes
Subd is abstract therefore it may seem it is hard to control the shapes you want to create. We show you all the practical techniques and tricks that make it easy and fun, without breaking your creative process.
Redirection and Shading
Managing topology includes understanding how to ‘redirect” your topology for proper edge flow and subd control. We show you how to do this in a way that creates beautiful, natural shading and transitions on your models.
Level of Detail and Mesh Clean-Up
One common mistake with subd modelers is they start with a dense mesh. Instead, you want to start as low-poly as possible, and then use subd to increase the level of detail. We show you how to do this (and clean up your mesh) inside the program.
Complete Modeling Workflow & Training
Learn how to piece everything together by creating a hard surface bot completely from scratch with quad-based topology. We show you the technical application and how to do everything, step-by-step, with real-time commentary.
Speed and Efficiency
Most subd courses out there (if not all) are all vanilla Blender based, which means the workflows they teach are super slow. We use HardOPS, Boxcutter, Machin3 Tools and Mesh Machine and Cablerator addons to make it almost as quick as boolean modeling.
BONUS: Rendering & Texturing
We’ll show you how to render & texture your model with our addon Material Works in order to create a proper portfolio piece. This isn’t required, but is a nice bonus so you get a complete workflow form start to finish.
BONUS: Portfolio Presentation
Having a proper portfolio showing off your work is essential.
Without it, even if you have the most badass game asset, no one will get "wowed" by your work. Make it count!
Project Files
Included are all the project files from the program so you can reverse-engineer the model or simply use it for reference.
Learn how to use “clean” quad-based topology to create models that work in a variety of pipelines. Great for VFX, animation, and other workflows where the model needs to be deformed and versatile.
It’s one thing to model in quads, but another game to manage topology and edge flow correctly. We show you how to do this without the usual technical stuff surrounding topology.
We show you how to design using quad topology from scratch without it being too technical or intimidating, so you will learn how to “think” in quads while working on your own projects.
Subd is abstract therefore it may seem it is hard to control the shapes you want to create. We show you all the practical techniques and tricks that make it easy and fun, without breaking your creative process.
Managing topology includes understanding how to ‘redirect” your topology for proper edge flow and subd control. We show you how to do this in a way that creates beautiful, natural shading and transitions on your models
One common mistake with subd modelers is they start with a dense mesh. Instead, you want to start as low-poly as possible, and then use subd to increase the level of detail. We show you how to do this (and clean up your mesh) inside the program.
Learn how to piece everything together by creating a hard surface bot completely from scratch with quad-based topology. We show you the technical application and how to do everything, step-by-step, with real-time commentary.

Most subd courses out there (if not all) are all vanilla Blender based, which means the workflows they teach are super slow. We use HardOPS, Boxcutter, Machin3 Tools and Mesh Machine and Cablerator addons to make it almost as quick as boolean modeling.
We’ll show you how to render & texture your model with our addon Material Works in order to create a proper portfolio piece. This isn’t required, but is a nice bonus so you get a complete workflow form start to finish.
Having a proper portfolio showing off your work is essential.
Without it, even if you have the most badass game asset, no one will get "wowed" by your work. Make it count!
Included are all the project files from the program so you can reverse-engineer the model or simply use it for reference.
project renders (clean, quad topology)

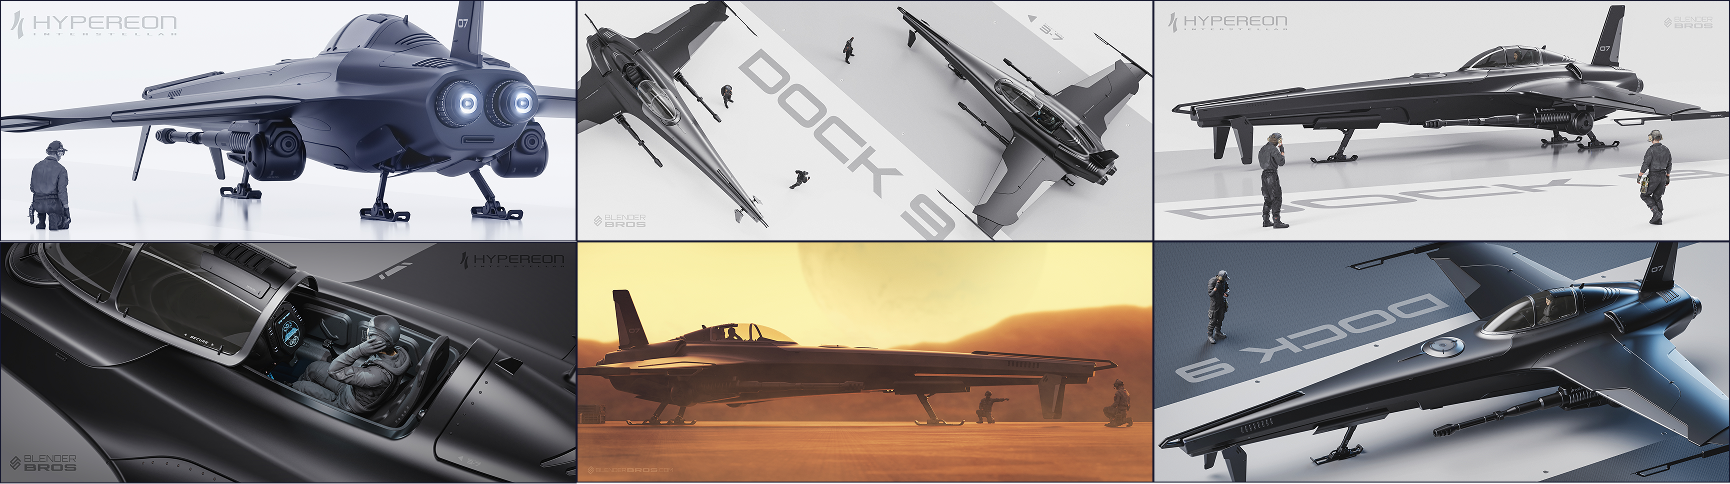
BONUS MODULE #1: THE ULTIMATE GUIDE TO PLASTICITY
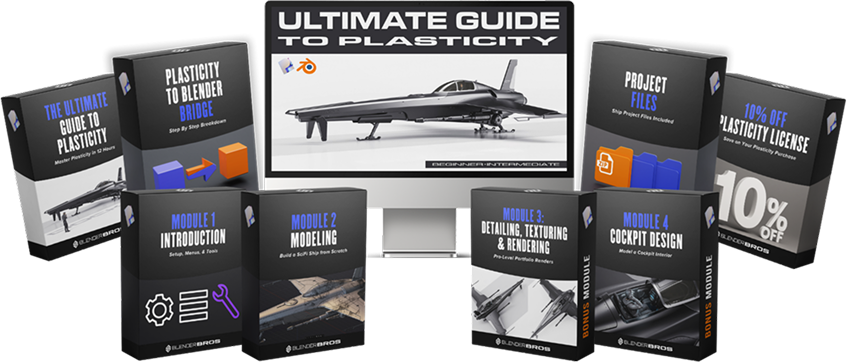
Learn the Plasticity software, a CAD-based hard surface modeling software, and the full toolset in under 12 hours. This software is a perfect combo to use with Blender if you like CAD workflows.
Model a clean SciFi ship from scratch using NURBS modeling, without topology headaches. All done in Plasticity from scratch.
Learn how to design the ship interior, exterior, concept detailing, and create clean organic + hard surface forms.
Bridge your Plasticity model to Blender (via Plasticity Bridge tool) then texture, light & render it inside of Blender.
Includes rendering, compositing, & post-processing workflows to create a finished portfolio asset.
Video Curriculum
Stage 1: Introduction
Learn how to install Plasticity, set up your menus from scratch, use custom shortcuts, and perform basic operations. (47 minutes)
Stage 2: Modeling
Learn how to use the tools practically by creating a SciFi ship from scratch. At the end of this section, you’ll feel comfortable using the modeling tools, performing basic operations, and creating your own models from scratch without any technical knowledge. (5 hours)
Bonus Modeling Section
Learn not only how to detail your models but also how to think like a concept artist. In this section, we will also model a fully functional interior of the ship’s cockpit. (3 hours)
Stage 3: Rendering
Learn how to render your completed models using Blender. This section is not just a guide on rendering, but a full-on masterclass on creating high-end pro-level renders for your portfolio. It is split into 6 parts. (2 hours 40 min)
what you'll make:
BONUS MODULE #2: THE HARD SURFACE GAME ASSET 2.0 TRAINING PROGRAM
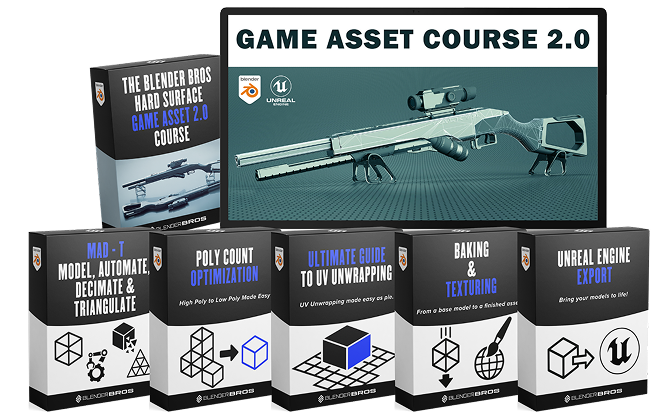
Learn how to create game-ready hard surface assets using a Boolean/ngon workflow – no retopology needed
Use our ‘MAD-T’ framework (which stands for Modeling, Automation, Decimation, Triangulation) to streamline your workflow.
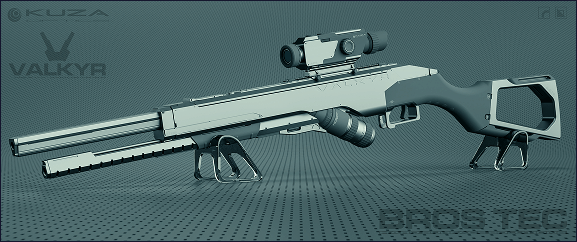
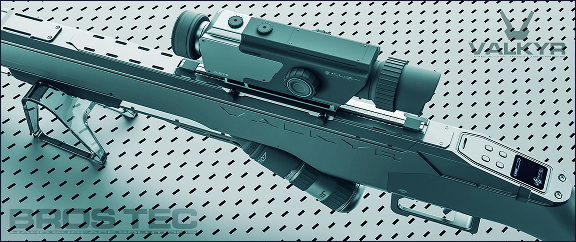
Build a full hard surface game asset from scratch, a SciFi rifle, from blockout to engine-ready export.
Learn how to unwrap, optimize, and triangulate meshes for clean import into Unreal, Unity, or other engines.
Apply advanced baking & texturi9ng techniques (Substance Painter workflow included).
Includes bonus modules: How to double your resolution using texture sets, our MAD-T PDF reference guide, and portfolio presentation.
Curriculum
Modeling: Complete SciFi Rifle modeling tutorials
Although this course aims to focus on our MAD-T framework for game assets, it wouldn't be a course without showing you the modeling as well!
We've included a full set of commentated, real-time tutorials on the creation of the SciFi rifle (shown in the course and on the thumbnail).
Decimation
Decimating your mesh is essential in order to have a well-optimized mesh. We use two primary techniques for this.
This is an essential step, otherwise you may have problematic bakes.
Automation
Too many people use the old, outdated method of manually applying their seams and UVs.
This method is slow and inefficient. We've developed a much more powerful solution to save you hours of time unwrapping.
Triangulation
Triangulation is essential for hard surface game assets. Without it, you're in for a big mess.
This is because external 3D software will have their own triangulation algorithms, and since we're using booleans and ngons, that is a big no-no! We'll show you how to fix that.
Baking
Baking is an essential part of the game asset workflow.
It allows you to take a low-poly mesh, and view it as if it were high-poly! This is a perfect technique for optimization.
Texturing
Once our model is complete, it's time to texture it!
We'll be using Substance Painter for this one, a powerful texturing software.
Unreal Engine Import
This is the easiest step of the entire process. Once your model is complete, you simply have to import it along with the textures.
BONUS MATERIAL: Double Your Resolution Using Texture Sets
Sometimes you just need more resolution, even though you're already using 2k or 4k.
You can easily achieve this using multiple texture sets, and we've included a bonus set of tutorials on how to do just that.
BONUS MATERIAL: Our MAD-T Framework PDF
We've included a full PDF reference guide to assist you after you complete the course.
Use it as a reference while you're making your own game assets!
BONUS MATERIAL: Portfolio Presentation
Having a proper portfolio showing off your work is essential.
Without it, even if you have the most badass game asset, no one will get "wowed" by your work. Make it count!
Although this course aims to focus on our MAD-T framework for game assets, it wouldn't be a course without showing you the modeling as well!
We've included a full set of commentated, real-time tutorials on the creation of the SciFi rifle (shown in the course and on the thumbnail).
Decimating your mesh is essential in order to have a well-optimized mesh. We use two primary techniques for this.
This is an essential step, otherwise you may have problematic bakes.
Too many people use the old, outdated method of manually applying their seams and UVs.
This method is slow and inefficient. We've developed a much more powerful solution to save you hours of time unwrapping.
Triangulation is essential for hard surface game assets. Without it, you're in for a big mess.
This is because external 3D software will have their own triangulation algorithms, and since we're using booleans and ngons, that is a big no-no! We'll show you how to fix that.
Baking is an essential part of the game asset workflow.
It allows you to take a low-poly mesh, and view it as if it were high-poly! This is a perfect technique for optimization.
Once our model is complete, it's time to texture it!
We'll be using Substance Painter for this one, a powerful texturing software.
This is the easiest step of the entire process. Once your model is complete, you simply have to import it along with the textures.

Sometimes you just need more resolution, even though you're already using 2k or 4k.
You can easily achieve this using multiple texture sets, and we've included a bonus set of tutorials on how to do just that.
We've included a full PDF reference guide to assist you after you complete the course.
Use it as a reference while you're making your own game assets!
Having a proper portfolio showing off your work is essential.
Without it, even if you have the most badass game asset, no one will get "wowed" by your work. Make it count!
rifle Renders


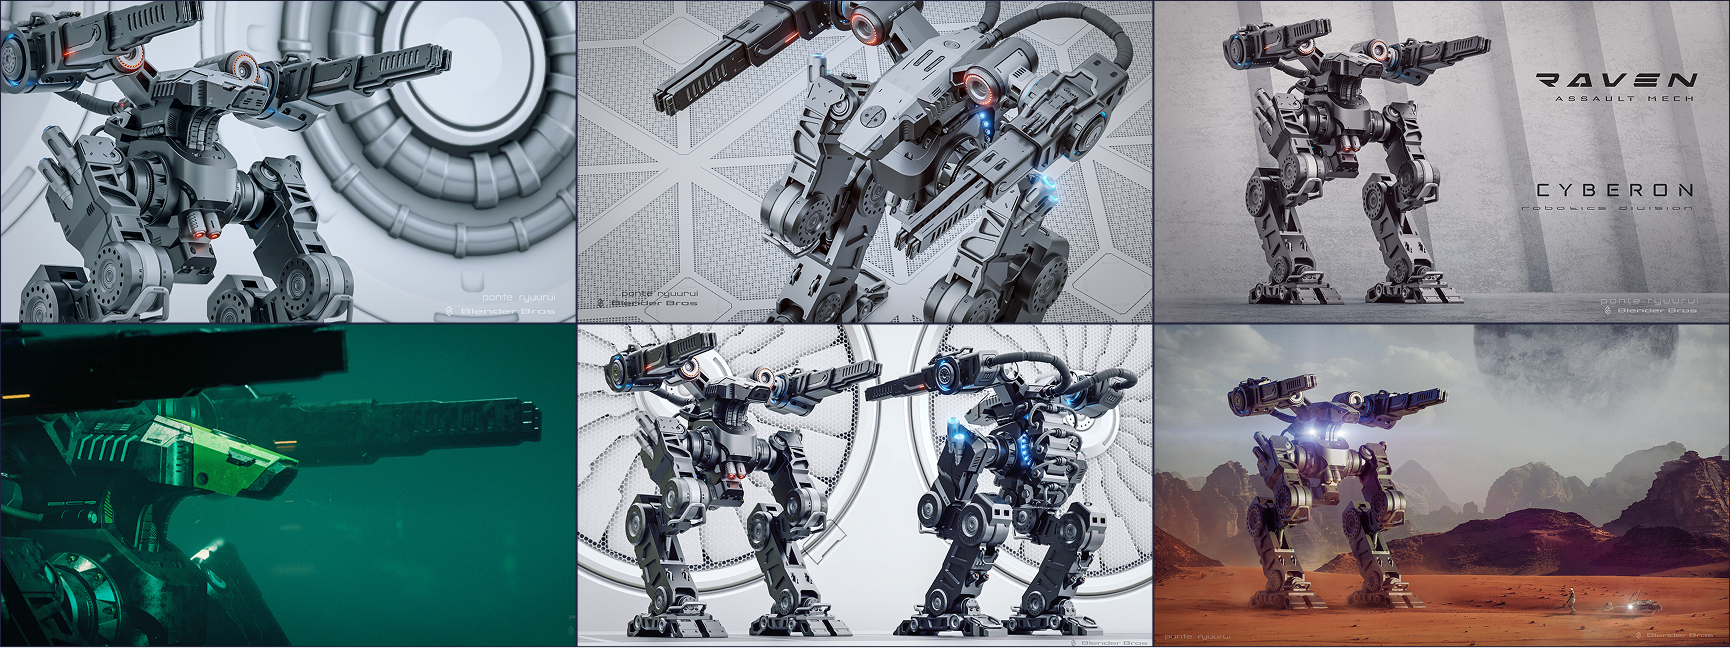
BONUS MODULE #3: SCIFI MECH DESIGN (ORIGINAL TRAINING)

This is our most advanced modeling tutorial, spanning over 50+ hours of modeling content. Learn how to create a highly advanced mech robot using Hard Ops & Boxcutter.
Learn visual design, proportions, scale, balance, and all the other elements that make a 3D model look visually appealing.
Watch step-by-step as we walk you through how to design a very advanced model from scratch in Blender. This training is not recommended for beginners. We recommend it after you’ve consumed the main material first.
mech renders

BONUS #1
MATERIALWORKS TEXTURING PLUGIN -
OUR PROPRIETARY TEXTURING PLUGIN FOR BLENDER ($297 VALUE)

Our exclusive Blender plugin that streamlines texturing & materials.
Get access to 50+ hard surface materials, 25+ edge wear & grunge maps, 6 studio HDRis for realistic lighting, and a brand new decal & trim sheet system built in.
This plugin contains over 21,000,000 different texturing permutations.
BONUS #2
100+ HOURS OF LIVE Q&A CALL RECORDINGS ($397 VALUE)

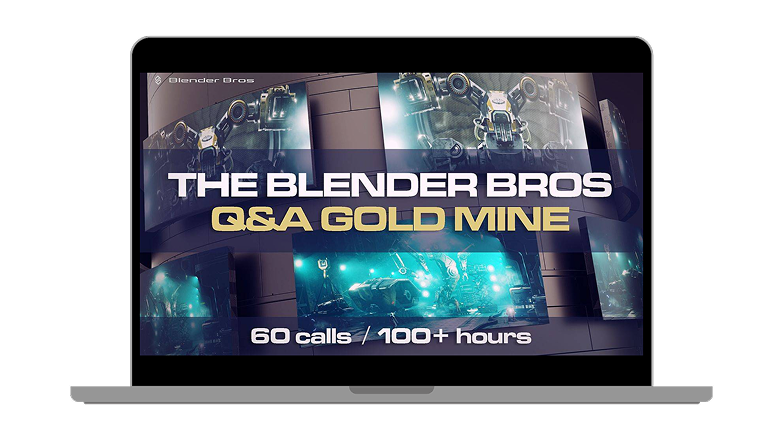
Access our archive of 100+ live coaching calls – instant answers to real student questions (you probably have the same questions covered in these calls)
Watch deep-dives on modeling techniques, rendering, workflows, and creative direction
Learn from previously recorded feedback & breakdowns.
BONUS #3
20 BONUS MINI-TRAININGS FOR QUICK WINS ($397 VALUE)
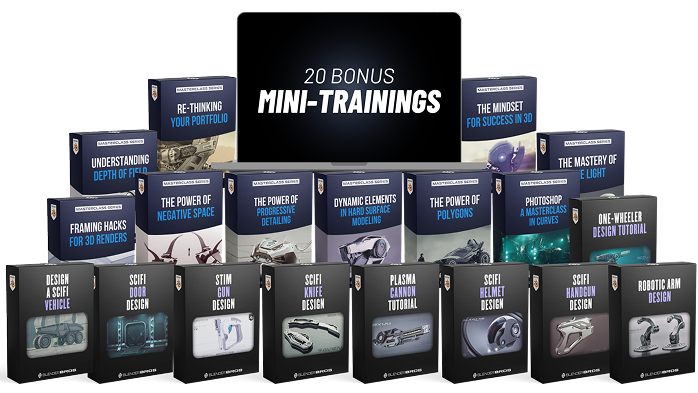
Short, focused modeling tutorials for quick wins. These are great to refine your skills further with shorter projects.
Perfect for quick improvements or creative refreshers.
Watch these when you’re uninspired, bored, or unmotivated – you’ll quickly be back into the groove of things and ready to work on your own projects.
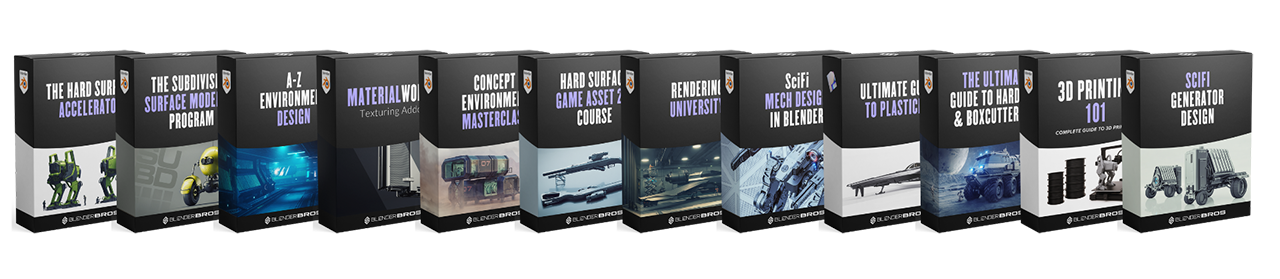
Here's Everything Included in the Hard Surface Academy:
On our call, we will discuss everything in-depth, go over each training program, coaching options,
and set up the right offer tailored to your specific needs.
Access to all training programs + products
Lifetime access.
6 Months Consulting

Get 6 months of consulting with Blender Bros.
INCLUDED
wEEKLY q&a calls
Access weekly live group Q&A calls with Josh & Ryuu for help.
INCLUDED
Unlimited direct messaging
Message us anytime for help or questions - our DMs are open
INCLUDED
AnyTime 1-1 Calls
Any-Time 1-1 Calls, so if you're stuck on something tricky, just call us.
INCLUDED
ENROLL NOW
Book a call below to join
All our Blender training programs + products
Any-Time 1-1 Calls
Unlimited Direct Messaging / Priority DM Support
Weekly Group Q&A Calls
6 Months Consulting With Josh & Ryuu
BONUS: MaterialWorks Texturing Plugin for Blender
BONUS: 100+ hours of Q&A recordings
BONUS: 20 bonus mini-trainings
what academy members are saying:
Frequently asked questions
Are all training programs updated for 2025?
Yes. Any major updates will be reflected inside the course. You can follow along in 2025 without any issues.
What skill level do I need to be?
The Hard Surface Academy is available for all skill levels, due to the custom nature of the program. Some of our clients just started Blender, while others need more advanced consulting.
How long will I have access to the training programs?
All training programs come with lifetime access + all future updates.
How much does the program cost?
Book a call above to discuss pricing options.
I have a question. Can I contact you?
You can email us at [email protected] with any questions you may have.
I already own some of the courses. Will I get a discount if I enroll?
Yes. Although the training programs inside the Academy are no longer available for standalone purchase, existing clients that already own some of the content will receive a discount.
© 2026. Blender Bros. All Rights Reserved
This site is not a part of the Facebook website or Meta Platforms, Inc. Additionally, this site is NOT endorsed by Meta in any way.
DISCLAIMER: Results shown are not typical and will vary based on effort, experience, and many other factors. We make no guarantees regarding your ability to get results.